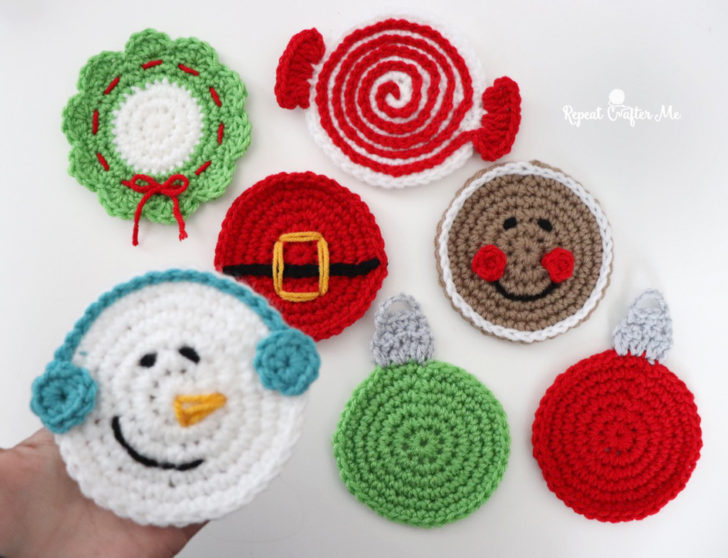
The holiday season is the perfect time to add a personal touch to your home decor, and one of the easiest ways to do so is by creating Crochet Christmas Coasters.
These coasters not only serve a practical purpose but also enhance the festive atmosphere with their beautiful designs.
Whether you’re an experienced crocheter or a beginner, this free tutorial will guide you step-by-step on how to make your own set of Christmas-themed coasters.

Crocheting is a relaxing and rewarding craft, and the holiday season is an excellent excuse to indulge in making handmade gifts and decorations.
With a few basic materials and a little creativity, you can create stunning Crochet Christmas Coasters that will make your table settings more festive. From simple designs to intricate patterns, the possibilities are endless.
This tutorial will walk you through the process of creating these charming coasters, ensuring that you have a fun and productive crafting experience.
In this article, we will show you how to crochet Christmas coasters, with easy-to-follow instructions and tips to help you achieve beautiful results.
Whether you plan to keep them for yourself or gift them to loved ones, these coasters will be a delightful addition to any holiday celebration. Let’s dive into the details of how to create these unique and festive coasters for Christmas.
1. Materials Needed for Crochet Christmas Coasters
Before you begin crocheting your Crochet Christmas Coasters, it’s important to gather all the necessary materials. Having everything ready will make the process smoother and ensure that your coasters turn out beautifully. Here’s a list of the materials you’ll need:
- Yarn: Choose yarn in Christmas colors such as red, green, white, and gold. Cotton yarn is an excellent choice because it’s absorbent and durable, making it ideal for coasters. You can also opt for acrylic yarn if you’re looking for a more budget-friendly option. Make sure the yarn weight is medium (like worsted weight) for the best results.
- Crochet Hook: The size of your crochet hook will depend on the yarn you choose. For medium-weight yarn, a hook size of 4.0mm to 5.0mm works well. If you’re unsure, check the yarn label for recommendations.
- Scissors: You’ll need a pair of sharp scissors to cut the yarn after you’ve finished each round of the coaster.
- Tapestry Needle: A tapestry needle is useful for weaving in the ends of your yarn when you’ve completed your project.
- Stitch Markers: Stitch markers will help you keep track of your rounds, ensuring that your coaster stays in shape as you work.
- Optional Embellishments: If you want to add extra holiday flair to your coasters, consider adding some small buttons or appliqué details like stars or holly leaves.
Once you have your materials ready, you’re all set to begin crocheting your Crochet Christmas Coasters.
2. Basic Crochet Christmas Coaster Pattern
Now that you have all the materials, let’s dive into the basic steps for creating your Crochet Christmas Coasters. This pattern is easy to follow, even for beginners, and you can customize it to fit your style. Here’s the step-by-step process:
- Start with a Magic Ring: To begin, create a magic ring, which will form the center of your coaster. If you’re not familiar with the magic ring, simply make a loop with your yarn and pull the working yarn through it.
- Crochet the First Round: Work six single crochet stitches into the magic ring. Pull the yarn tail tightly to close the loop. You should have six stitches in total. Place a stitch marker at the beginning of the round.
- Increase in the Next Round: For the next round, work two single crochet stitches in each stitch around. This will give you 12 stitches by the end of the round. Keep track of your rounds with the stitch marker.
- Continue Increasing: In the following rounds, you’ll continue increasing by working two single crochet stitches in each stitch from the previous round. After a few rounds, your coaster will begin to take shape. You can add as many rounds as you like, depending on the size you want for your coasters.
- Finish the Coaster: Once your coaster reaches the desired size, finish the project by crocheting a few more rounds in a contrasting color. This will give your coaster a nice border. Cut the yarn and weave in any loose ends with your tapestry needle.
- Repeat for More Coasters: If you’re making a set of coasters, repeat the steps above to create as many coasters as you need. You can even experiment with different colors to add variety to the set.
This simple yet effective pattern is perfect for creating Crochet Christmas Coasters that will bring festive cheer to your home.
3. Customizing Your Crochet Christmas Coasters
One of the best things about crocheting is the ability to personalize your projects. Once you’ve mastered the basic pattern for your Crochet Christmas Coasters, you can customize them to make them truly unique. Here are some ideas to help you add your personal touch to your coasters:
- Add Holiday-themed Embellishments: Use small holiday-themed appliqué patterns, such as a Christmas tree, star, or snowflake. These can be stitched on after you’ve completed the base coaster pattern. You can also use buttons in the shape of Santa hats, Christmas trees, or other festive items.
- Experiment with Different Borders: Instead of a simple single crochet border, try using different stitch patterns, like picot or shell stitches, to create a more intricate edge.
- Use Multiple Colors: Don’t hesitate to play with color combinations. Use different shades of red and green for a more traditional look, or add white and gold for a more elegant style. Stripes or color-blocking techniques can also make your coasters stand out.
- Make Larger Coasters: If you’d like to create larger coasters to hold mugs or even small plates, simply increase the number of rounds or use thicker yarn.
- Add Glittery Yarn: For a bit of sparkle, try using metallic or glittery yarn in your design. This will give your Crochet Christmas Coasters a festive shine that’s perfect for holiday gatherings.
- Create a Matching Set: If you’re making coasters as a gift, consider creating a matching set with different designs. For example, each coaster could feature a different holiday symbol like a snowman, Christmas wreath, or candy cane.
With these customization ideas, you can create a set of Crochet Christmas Coasters that reflect your personality and add an extra touch of festive cheer to your home.
4. Tips for Perfect Crochet Christmas Coasters
To ensure that your Crochet Christmas Coasters turn out beautifully and last for many holiday seasons to come, here are some helpful tips to keep in mind:
- Use High-Quality Yarn: Since coasters are used frequently, it’s essential to use durable yarn. Cotton yarn is the best option because it is both absorbent and strong, making it ideal for this project.
- Gauge Matters: Be mindful of your tension while crocheting. If your stitches are too tight or too loose, it can affect the shape and size of your coaster. To maintain consistency, practice your stitches before starting on the final project.
- Blocking: After finishing your coaster, you can block it to ensure that it keeps its shape. Simply wet the coaster and gently shape it into a circle, then allow it to dry flat.
- Experiment with Different Stitches: While single crochet is the most common stitch for coasters, don’t be afraid to experiment with other crochet stitches like half-double crochet or double crochet to give your coasters a unique texture.
- Gift Your Coasters: Crochet Christmas Coasters make wonderful homemade gifts. Package them nicely with a festive ribbon or in a cute basket for a charming holiday present.
- Care Instructions: To ensure the longevity of your coasters, wash them gently by hand or machine wash them on a delicate cycle. Lay them flat to dry to prevent any warping.
By following these tips, your Crochet Christmas Coasters will not only look great but also stand the test of time.
FAQ: Frequently Asked Questions
1. What yarn should I use for Crochet Christmas Coasters?
Cotton yarn is highly recommended for coasters because it is absorbent and durable. You can also use acrylic yarn for a budget-friendly option, but cotton is ideal for long-lasting use.
2. How long does it take to make Crochet Christmas Coasters?
The time it takes depends on your crochet skill level and the complexity of your design. For a basic coaster, it could take around 30-45 minutes per coaster.
3. Can I use a different crochet stitch for the coasters?
Yes, you can experiment with other stitches like half-double crochet or double crochet to create different textures and effects.
4. How do I make my coasters flat?
To keep your coasters flat, avoid crocheting too tightly. Blocking your coasters after finishing them will also help them retain their shape.
5. Can I make these coasters in different sizes?
Absolutely! By increasing the number of rounds or using thicker yarn, you can create coasters of various sizes, perfect for mugs, glasses, or small plates.
6. How do I care for my Crochet Christmas Coasters?
Hand wash or machine wash your coasters on a delicate cycle, and lay them flat to dry to maintain their shape.
Join our VIP broadcast list and gain access to exclusive patterns, all for free. As a VIP member, you’ll receive the best patterns daily, delivered directly to your device. ✨📱 It’s a unique opportunity to stay up-to-date with the latest trends and designs, curated just for you. Don’t miss out on enhancing your projects and discovering new inspirations with the best patterns every day! 🎨🔝
Conclusion
In this tutorial, we’ve walked you through the process of creating Crochet Christmas Coasters from start to finish.
We covered the materials you need, the basic pattern, how to customize your coasters, and tips for ensuring that your coasters turn out beautifully.
With these instructions, you can easily craft coasters that will add a personal touch to your holiday décor or make a thoughtful homemade gift.
VIDEO TUTORIAL
We’d love to hear your thoughts on this tutorial. Please leave a comment with your feedback or any suggestions for future posts. Happy crocheting!


