
Macrame Heart Bracelet - Free Tutorial

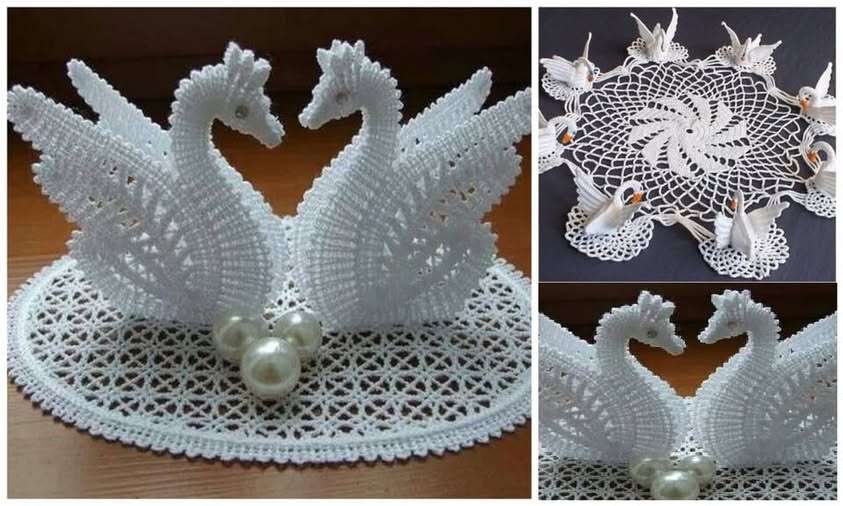
If you’re searching for a beautiful and delicate project, the Crochet Swan – FREE PATTERN might just be the perfect addition to your craft list.
This lovely swan design is both elegant and whimsical, capturing the grace of the real bird in soft yarn. Whether you’re an experienced crocheter or a curious beginner, this project offers a fun challenge with a stunning result.
The Crochet Swan – FREE PATTERN is ideal for home décor, nursery accents, or as a thoughtful handmade gift. It’s versatile enough to be turned into a toy, centerpiece, or even part of a mobile.
Plus, it’s a great way to use your creativity by playing with yarn types and colors. The pattern allows for customization, so you can create a swan that reflects your personal style.
This article will guide you through the entire process—from materials and stitches to assembly and final touches. We’ll also share tips to make your swan neat and long-lasting. Let’s begin the magical journey of creating a crochet swan that will surely steal hearts!
To start your Crochet Swan – FREE PATTERN, you’ll first need to gather the right materials. The good news is that this project doesn’t require a lot of supplies, making it perfect for using up leftover yarn or a small stash.
Choose a soft, white or cream-colored yarn for a classic swan look. Cotton or acrylic yarns work well, especially those with a smooth texture for clean stitches and easy shaping.
A smaller-sized hook, like 2.5mm to 3.5mm, is recommended to ensure tight stitches. This helps the swan maintain its shape and prevents stuffing from showing through.
You’ll also need polyester fiberfill for stuffing. Make sure it’s light and fluffy to give the swan a soft, cuddly feel while retaining structure.
Stitch markers can be very helpful when working in the round. They keep track of your rows and help avoid mistakes, especially in complex sections.
Safety eyes or black yarn for embroidery can be used for the swan’s eyes. Choose whichever method you feel more comfortable with for the best look.
Other helpful tools include a yarn needle for sewing parts together, scissors, and pins for positioning wings and other features before attaching.
Now that you have your materials ready, it’s time to begin crocheting the main part of the Crochet Swan – FREE PATTERN: the body. This is the central piece that everything else will be built around.
Start by creating a magic ring. This technique allows you to begin crocheting in the round with no hole in the center, giving a clean and professional look.
Work single crochet stitches evenly in the round, slowly increasing in size to shape the swan’s base and body. This will give it that smooth, elegant form.
As you progress, continue to follow the pattern’s increases and decreases. The shaping is what gives the swan its graceful curve and realistic structure.
Remember to stuff the body gently but firmly as you go. It’s easier to do this in stages rather than trying to insert all the stuffing at the end.
Once the body is complete, fasten off and weave in any loose ends. You can shape it slightly with your hands to smooth out any irregular curves.
Make sure the base sits flat if your swan is intended to be a standing decoration. If it’s for a mobile or toy, this may not be necessary.
After completing the body, it’s time to crochet the details that bring the Crochet Swan – FREE PATTERN to life. These include the wings, neck, and beak—all of which make the swan instantly recognizable.
The wings are usually made separately and attached to each side of the body. You can crochet them flat or slightly three-dimensional, depending on the pattern.
For a realistic look, consider using textured stitches like puff or shell stitches to give the wings more depth and softness.
The neck and head are often crocheted as one piece. Start from the bottom and work up, shaping with increases and decreases as directed in the pattern.
The neck should be firm and gently curved. Use pipe cleaners or wire wrapped in yarn if you want to create a poseable neck that holds its shape.
The beak is a small but important part. Crochet it with contrasting orange or yellow yarn, and stitch it neatly to the face area of the swan’s head.
Once all parts are ready, pin them in place before sewing. This helps ensure proper alignment and symmetry, making your swan look well-balanced.
One of the best things about the Crochet Swan – FREE PATTERN is how easily you can customize it. With just a few tweaks, your swan can suit different occasions, themes, or color palettes.
Try making a black swan for a dramatic variation. Use rich black yarn and perhaps a touch of gold or silver for embellishments.
Add a small crochet crown or tiara to turn your swan into a regal princess! This makes it especially fun for nursery decor or a child’s gift.
Use pinks, pastels, or metallic yarns for a more whimsical, fantasy-themed swan. Sparkle yarns can add a touch of magic and shine.
Embroider the swan’s name or initials on the underside of its wings if it’s intended as a keepsake. This adds a personal and heartfelt touch.
You can also make smaller or larger versions by adjusting your hook size and yarn thickness. Mini swans are perfect for keychains or mobiles.
Finally, consider adding a ribbon around the neck or a small bow for extra charm. Just be sure any embellishments are securely attached, especially for items given to children.
Is this pattern suitable for beginners?
Yes, the Crochet Swan – FREE PATTERN is beginner-friendly if you’re familiar with basic stitches like single crochet and increases. Patience and attention to detail will help ensure success.
How long does it take to crochet the swan?
Depending on your experience, the swan can take 3 to 5 hours to complete. Breaking it into parts—body, wings, and accessories—can make it easier to manage.
What type of yarn is best for this project?
Cotton or soft acrylic yarns in DK or worsted weight are ideal. They offer structure and softness while holding shape well.
Can I machine wash the crochet swan?
If made with machine-washable yarn and securely stitched, yes. However, hand washing is often recommended to preserve shape and detailing.
Is the swan safe for babies or small children?
Yes, but avoid using safety eyes or small embellishments for baby gifts. Instead, embroider the eyes with yarn and double-check all parts are securely attached.
Can I sell the swan if I follow this free pattern?
Yes, as long as the original designer allows it. Most free patterns allow for handmade items to be sold if credit is given. Always check the pattern’s licensing terms.
Join our VIP broadcast list and gain access to exclusive patterns, all for free. As a VIP member, you’ll receive the best patterns daily, delivered directly to your device. ✨📱 It’s a unique opportunity to stay up-to-date with the latest trends and designs, curated just for you. Don’t miss out on enhancing your projects and discovering new inspirations with the best patterns every day! 🎨🔝
The Crochet Swan – FREE PATTERN offers a creative and satisfying project that combines beauty and charm. From its soft curves to the detailed wings, this pattern gives crafters a chance to create something both elegant and personal. Whether it becomes a gift, a keepsake, or a lovely decoration, your swan will certainly capture attention and admiration.
We hope this tutorial inspired you to try the Crochet Swan – FREE PATTERN. If you enjoyed the guide, please share your experience in the comments. Your feedback helps us create better content and keeps the crochet community growing. We’d love to hear your thoughts, tips, or suggestions for future patterns!


