
Macrame Heart Bracelet - Free Tutorial

If you’re a creative soul with a love for marine life, this guide on how to Design Your Own Sea Creature – Free Pattern is going to spark your imagination and ignite your crafting skills.
Whether you crochet, sew, embroider, or simply enjoy sketching and designing, this pattern guide will help you bring your very own sea creature to life—completely for free.
The beauty of designing your own sea creature lies in the freedom to explore color, texture, size, and shape. From whimsical jellyfish to quirky crabs or elegant sea horses, you’re not limited by store-bought templates. Instead, you’ll use your creativity to craft something truly personal and playful.
This tutorial will walk you through the steps to Design Your Own Sea Creature – Free Pattern, from inspiration and sketching to choosing materials and finishing your creation.
Whether you’re a seasoned crafter or a total beginner, you’ll find this project fun, relaxing, and deeply satisfying.
Every creative project starts with an idea. When it comes to Design Your Own Sea Creature – Free Pattern, inspiration can come from anywhere—nature documentaries, picture books, aquariums, or even your own imagination.
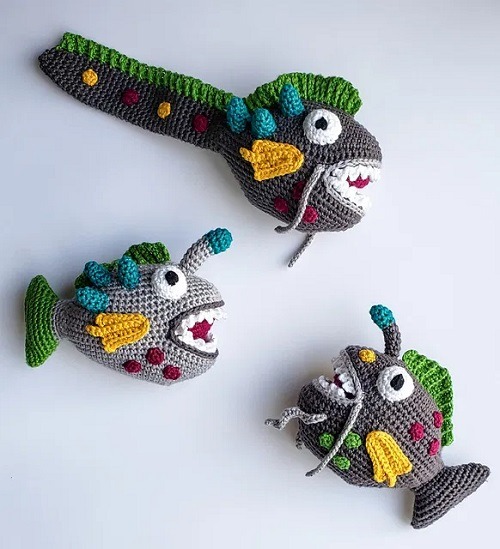
Begin by researching real sea creatures. Look at images of octopuses, turtles, anglerfish, and coral reef species. Notice their shapes, features, and how they move. This can guide your design while allowing for plenty of creative liberties.
Once inspired, grab a sketchbook or a piece of paper and start drawing. Don’t worry about being a professional artist—the goal is to visualize the features you want: tentacles, fins, eyes, scales, or shells.
Add personality! Maybe your sea creature has oversized eyes, a goofy grin, or rainbow-colored fins. Sketching allows you to make decisions about size, colors, and materials before diving into crafting.
Think about what type of project you want this to become. Will it be a plushie, an embroidery hoop design, a paper pattern, or an amigurumi crochet creation? That decision helps guide your next steps.
Finalize your sketch with any notes on color, texture, or features. This serves as your visual pattern reference as you move forward.
Remember, this is your sea creature. There are no rules. That’s what makes Design Your Own Sea Creature – Free Pattern so special and liberating.
Once you’ve designed your sea creature, it’s time to gather the materials to make it real. The type of project you chose—crochet, sewing, embroidery, or even felt craft—will determine what supplies you need.
If you’re crocheting, you’ll need yarn in various colors, a hook that matches your yarn weight, stuffing fiber, and safety eyes or embroidery floss for details. Cotton yarn works great for crisp stitches, while plush yarn gives a soft, squishy look.
For sewing a plush or felt version, gather fabrics like fleece, felt, or cotton, along with coordinating thread, stuffing, and embellishments like buttons, sequins, or beads.
If you’re doing embroidery, you’ll want an embroidery hoop, fabric, embroidery floss in your chosen colors, a sharp needle, and a transfer pen to outline your design on fabric.
Paper crafters can use colored cardstock, glue, googly eyes, glitter, and scissors to bring their sea creatures to life through collage and cut-out designs.
Make sure you have basic crafting tools on hand: scissors, measuring tape or ruler, pins or clips, and a safe space to work.
Choosing the right materials will enhance the personality of your creature. Soft yarns make it cuddly, shiny fabrics add sparkle, and colorful floss brings a lively feel to embroidery.
Now it’s time to take your sketch and turn it into an actual free pattern you can follow and even share. This is where the magic happens in the Design Your Own Sea Creature – Free Pattern journey.
Start by drawing or tracing your sea creature design on a clean sheet of paper, breaking it into separate parts—like a head, body, arms, or fins. Label each piece clearly with its size and shape.
For sewing or felt crafts, cut out these parts and use them as templates to trace onto fabric. Remember to leave seam allowances if you’re sewing.
For crochet projects, write out the pattern steps: how many stitches per round, increases or decreases, and any color changes. Use standard crochet abbreviations to keep it clear and consistent.
If you’re embroidering, you can either trace your design directly onto fabric with a transfer pen or use a lightbox or window for tracing. Mark where each stitch type should go (e.g., backstitch, satin stitch, French knots).
Now start crafting! Follow your own pattern step by step. If something feels off, adjust as you go. This is your creation—it’s okay to improvise and refine.
Take photos of the process if you plan to share your pattern online or with friends. It’s a great way to document the evolution of your Design Your Own Sea Creature – Free Pattern masterpiece.
Your sea creature is nearly complete! It’s time for finishing details, creative embellishments, and deciding how to display or share your adorable ocean friend.
Add any final features—such as embroidered eyes, fabric paint spots, or sewn-on decorations. Little details go a long way in adding charm and personality.
If your creature is stuffed, sew or crochet the last seam carefully. If it’s flat, make sure the edges are clean and all threads or fabric ends are secured.
Think about how your sea creature will be used. Will it be a toy, a wall decoration, a keychain, or a gift? That decision can guide your finishing techniques.
Want to share your pattern? Write it clearly, add photos, and create a printable PDF if you’d like to offer it to others. Many crafters love downloadable, free patterns they can use or customize.
If you’re proud of your work (and you should be!), consider framing it, adding it to a mobile for a child’s room, or creating a collection of sea creatures for your craft booth or Etsy shop.
Finishing your Design Your Own Sea Creature – Free Pattern project is an exciting milestone. Celebrate your creativity and maybe even start designing your next creature!
Do I need to be good at drawing to design my own sea creature?
Not at all! Basic sketches are enough. The idea is to capture the concept—perfection isn’t required.
What if I don’t crochet or sew?
No problem! You can still create your sea creature through embroidery, paper crafts, or even digital illustration.
Can I sell the creature I make?
Yes, as long as the design is original and your own. Many crafters sell their handmade creations based on their custom patterns.
Is there a printable version of this free pattern?
This guide helps you create your own pattern. You can write or type it out for personal use or sharing.
What’s the best material for a plush sea creature?
Felt and fleece are great for sewing, while plush yarn gives a soft and cuddly finish for crochet.
Can kids try this project too?
Absolutely! Kids can sketch, color, and help choose materials. It’s a wonderful creative activity for all ages.
Designing your own sea creature is not just a craft—it’s an invitation to express your creativity in the most imaginative way. With this complete guide on how to Design Your Own Sea Creature – Free Pattern, you’ve learned how to find inspiration, sketch your creature, choose the right materials, create a working pattern, and bring your underwater friend to life.
From the first pencil line to the final stitch or glue dot, this project is filled with joy, learning, and freedom. There’s no right or wrong—just the beautiful, personal outcome of your creativity.
We’d love to know what you created! Please leave a comment below with your thoughts, your creature’s name, or any tips you have for other crafters. And if you have suggestions for future DIY guides, we’re always open to your ideas!


