
The DIY Crochet Mesh Bag Tutorial – Free Pattern is a must-have project for anyone who loves stylish, eco-friendly, and functional handmade items.
Whether you’re new to crochet or an experienced crafter looking for your next practical creation, a mesh bag is a rewarding and accessible choice. Lightweight and versatile, these bags are perfect for groceries, beach days, or everyday use.
Crochet mesh bags are not only beautiful, but also sustainable. In today’s world, where reducing plastic use is a growing priority, making your own reusable bag is both environmentally conscious and fun.
You get to choose your own yarn, colors, and size, making each piece uniquely yours. This tutorial will guide you through the steps to create a stunning and durable mesh bag from scratch.
This DIY Crochet Mesh Bag Tutorial – Free Pattern offers you everything you need to succeed—from the materials and stitches required to expert tips on customization.
You’ll find detailed explanations on how to construct the base, create the mesh body, and finish with strong, comfortable handles. Let’s dive into this creative journey and make a beautiful crochet mesh bag you’ll be proud to carry.
1. Why Make Your Own Crochet Mesh Bag?
One of the most appealing reasons to follow a DIY Crochet Mesh Bag Tutorial – Free Pattern is the freedom to create a bag that fits your lifestyle. Unlike store-bought alternatives, you get to decide the size, color scheme, and texture of the bag.
Handmade mesh bags are lightweight and compact. You can fold them and tuck them into your purse or glove compartment, making them ideal for spontaneous shopping trips or outdoor adventures.
They’re also eco-conscious. By replacing single-use plastic bags with your own handmade versions, you’re contributing to a cleaner planet and encouraging others to do the same.
Another benefit is durability. When crocheted with strong yarn and tight stitches, a mesh bag can carry surprising amounts of weight while maintaining its shape and stretch.
Crochet projects like this one also offer mental wellness benefits. The repetitive motion of crocheting can be meditative, stress-relieving, and highly rewarding, especially when your finished piece is functional and beautiful.
Following a free pattern means you can start creating without any cost, and you can even use leftover yarns from other projects, making this a budget-friendly option as well.
2. Materials and Stitches You’ll Need
Before beginning this DIY Crochet Mesh Bag Tutorial – Free Pattern, let’s gather the essentials. Fortunately, you won’t need many supplies to get started—just yarn, a hook, and some basic tools.
For yarn, cotton is highly recommended. It’s breathable, durable, and can handle weight without stretching too much. Choose a DK or worsted weight cotton yarn for a balance between strength and lightness.
Use a crochet hook that matches your yarn. Most cotton yarns work well with a 4.0 mm to 5.5 mm hook. The hook size will influence the tightness of your stitches, which affects the structure of your mesh bag.
You’ll also need scissors, a yarn needle for weaving in ends, and stitch markers to keep track of rounds if you’re working in the round.
As for stitches, the most common used in a mesh bag are chain stitch (ch), slip stitch (sl st), single crochet (sc), and double crochet (dc). These are basic stitches, making the pattern suitable for beginners.
You’ll also work with chain spaces to form the mesh design. Don’t worry if that sounds new—this tutorial will explain everything step-by-step.
Once you’re set with materials and familiar with the stitches, you’re ready to dive into the pattern and bring your crochet mesh bag to life.
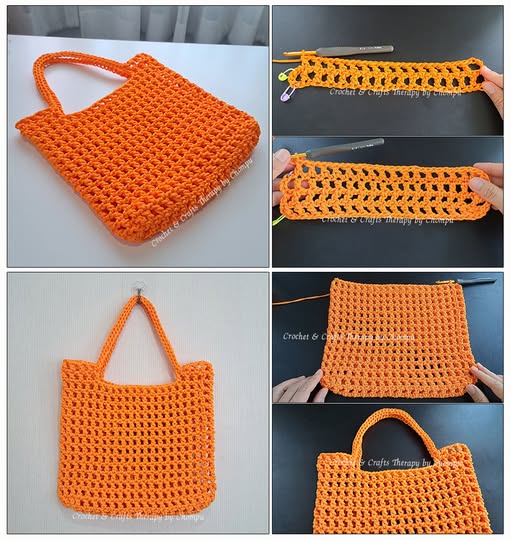
3. Step-by-Step: How to Crochet Your Mesh Bag
Now that you’re prepared, let’s begin the actual DIY Crochet Mesh Bag Tutorial – Free Pattern. We’ll break it down into simple sections so you can follow along easily, whether you’re a beginner or experienced crocheter.
Start with the base of the bag. Most mesh bags begin with a flat oval or circle made with single crochets or half double crochets. This provides stability for the items you’ll carry later.
Once the base is complete, you’ll move on to the mesh body. This part is created by alternating chains and double crochets. For example, you may ch 3, skip 1 stitch, dc in the next to create open spaces in a consistent pattern.
Continue this mesh pattern for as many rows as needed, depending on how deep you want your bag. A standard grocery-size mesh bag typically has 20–30 rows.
Next, we move to the top edge and handles. To strengthen the top, switch back to single or half double crochet stitches and add 2–3 solid rows. This ensures your handles are supported.
Create your handles by chaining a length (30–50 stitches depending on how long you want them), then attaching it to the opposite side of the bag with a slip stitch or single crochet. Reinforce the handles by working another row or two across them.
Finish by weaving in all loose ends and blocking the bag (optional) to shape it perfectly. Now you have a finished, eco-friendly crochet mesh bag!
4. Customizing Your Mesh Bag Design
The beauty of the DIY Crochet Mesh Bag Tutorial – Free Pattern is how easily it can be personalized. From changing yarn colors to adjusting the size or shape, there’s endless room for creativity.
One fun option is using gradient or ombré yarn to create a beautiful color transition throughout the bag. This requires no extra effort but gives a stunning visual result.
You can also change the mesh stitch pattern. Instead of dc and chains, try variations like filet mesh or Solomon’s knot for different textures and openness.
For a sturdier bag, line the inside with fabric. This prevents small items from poking through the holes and adds a finished, professional look.
Add decorative elements like tassels, wooden rings, or buttons for personality. These touches make your bag one of a kind and great for gifting.
Another option is adjusting the size and shape. Make mini mesh bags for produce or large totes for beach trips. All you need to do is increase or decrease the number of rows and stitches.
You can even make seasonal versions. Try red and green for Christmas, pastels for spring, or neutral tones for year-round elegance. The flexibility of this pattern makes it an ideal canvas for your ideas.
FAQ – DIY Crochet Mesh Bag Tutorial – Free Pattern
Is this crochet mesh bag pattern beginner-friendly?
Yes! If you know basic stitches like chain, single crochet, and double crochet, you’ll be able to follow this pattern easily.
What type of yarn is best for a mesh bag?
Cotton yarn is the top choice because it’s strong, washable, and holds its shape well. Avoid stretchy or fuzzy yarns.
Can I make the bag larger or smaller?
Absolutely! Just increase or decrease the number of rows and stitches to adjust the height and width of the bag.
How long does it take to make a crochet mesh bag?
Depending on your speed and experience, it usually takes 4–6 hours to complete a standard-size bag.
Can I wash the crochet mesh bag?
Yes. Use machine-washable yarn, and you can clean the bag in cold water on a gentle cycle. Lay flat to dry.
Do I need to line the bag with fabric?
It’s optional. Lining adds durability and prevents small items from falling out, but it’s not necessary for all uses.
Conclusion
Creating your own DIY Crochet Mesh Bag using a free pattern is not just a practical project—it’s also a satisfying and eco-conscious way to express your creativity. From choosing yarns to customizing the size and design, this pattern offers endless flexibility and style.
We’ve covered everything from materials and stitches to a full step-by-step guide and customization tips. Whether you’re making it for yourself, as a gift, or for your handmade shop, a crochet mesh bag is always a great idea.
Now it’s your turn! What did you think of this DIY Crochet Mesh Bag Tutorial – Free Pattern? Have you made one before? Leave a comment below with your opinion, tips, or suggestions. Your feedback helps our community grow and inspires new ideas!


