
If you love sewing and organizing, then this 11-pocket fabric wallet – Free pattern is the perfect project for you! This compact and functional wallet is ideal for keeping cards, coins, receipts, and even your phone neatly stored in one stylish place.
Whether you’re looking to make something practical for everyday use or a thoughtful handmade gift, this wallet checks all the boxes.
With eleven pockets of various sizes, this design balances both utility and aesthetics. The best part? You don’t need advanced sewing skills to create it.
This tutorial is beginner-friendly and requires only basic sewing techniques, making it a wonderful project for anyone looking to expand their sewing skills.
In this comprehensive guide, you’ll learn step by step how to create your own 11-pocket fabric wallet, using the free pattern included.
We’ll walk you through the materials, cutting, sewing process, and final touches to help you sew a wallet that’s both beautiful and highly functional.
1. Materials and Fabric Selection
Before diving into this 11-pocket fabric wallet – Free pattern, let’s gather all the materials you’ll need. Choosing the right fabrics and notions can make a big difference in the final product’s durability and appearance.
You will need:
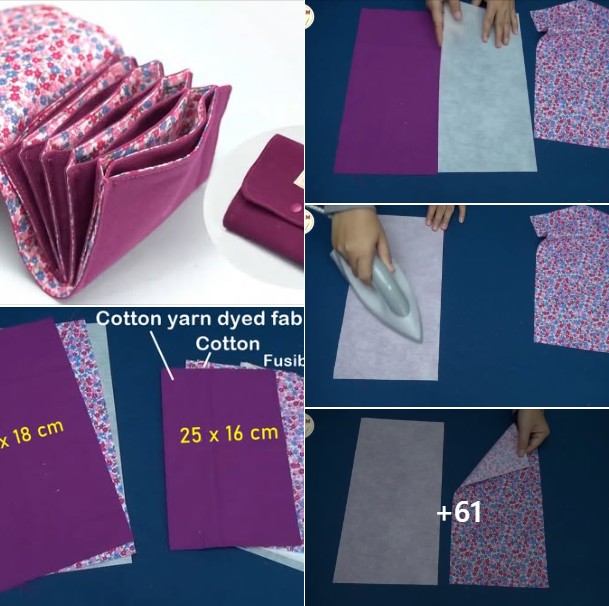
- Cotton fabric (three coordinating prints: outer, lining, and pocket)
- Lightweight fusible interfacing
- Medium-weight interfacing or fusible fleece for structure
- 1 zipper (6” or 7”)
- Magnetic snap or button closure
- Sewing thread in matching or contrasting color
- Rotary cutter, ruler, and mat
- Sewing machine and iron
For a sturdy and professional finish, use quality quilting cotton. It’s easy to work with and offers great color and pattern options. Consider using solid colors for the lining and bold prints for the outer part of the wallet to create a visual contrast.
Pre-washing the fabric is recommended to avoid shrinkage and fabric bleeding. Once your materials are ready, print and cut out the free pattern pieces included with this tutorial.
2. Cutting and Preparing the Pieces
With your materials and pattern ready, it’s time to begin preparing your fabric for the 11-pocket fabric wallet. This part of the process sets the stage for a successful sewing experience.
Follow the pattern pieces to cut out:
- Outer wallet panels
- Lining panels
- Pocket pieces (you’ll need several for the inner compartments)
- Interfacing pieces to match each section
Fuse the interfacing to the wrong sides of the fabric pieces where needed. Use lightweight interfacing for the pockets to keep them flexible, and medium-weight for the outer layers to give the wallet structure and durability.
After fusing, press all your pieces with an iron to remove any wrinkles. Mark the fold lines on the pockets using a fabric-safe marker or chalk.
If your wallet design includes a zipper pocket, now is the time to prepare it. Take your zipper and position it between two pocket pieces, right sides together, then sew and turn. Topstitch for a neat finish.
Proper preparation and precise cutting help ensure the wallet comes together evenly, especially when sewing multiple layers. Take your time and enjoy the process—this is where your fabric choices start coming to life.
3. Assembling the Wallet Body
Now that your pieces are prepped, let’s start sewing the main structure of your 11-pocket fabric wallet. This stage involves organizing and layering the pockets before attaching everything together.
Start with the interior:
- Stack the card slot pockets evenly, aligning each one according to the pattern. Topstitch each layer to secure the fold.
- Attach the zippered pocket to the lining panel, making sure it’s centered and straight.
- Add the remaining compartments, such as bill holders or vertical slip pockets.
Once the inside pieces are sewn and secured, turn to the outer body of the wallet:
- Attach a snap or button closure to the front flap using interfacing for reinforcement.
- If desired, you can quilt the outer fabric to add texture and additional durability.
- Place the outer and inner panels right sides together, and sew around the edges, leaving a small opening for turning.
Trim corners and curves to reduce bulk, then turn the wallet right side out. Press carefully and topstitch all around the edge to close the gap and give the wallet a polished look.
Take a moment to admire your progress—your 11-pocket fabric wallet is almost complete!
4. Finishing Touches and Usage Ideas
With the body sewn, now it’s time to add the finishing touches to your 11-pocket fabric wallet – Free pattern project. These final steps bring everything together and make your wallet ready for everyday use.
Reinforce any stress points, especially around closures and card slots, by sewing an extra line of stitching. If using a magnetic snap, ensure it’s securely fastened and aligned so the wallet closes properly.
Add a label or tag if you’re planning to gift or sell the wallet—it gives a personal and professional touch. You can also embellish the outer fabric with embroidery, buttons, or decorative stitching if you want to customize it further.
This wallet is perfect for:
- Everyday use: cards, cash, coins, and a phone fit neatly inside
- Travel: store passports, boarding passes, and foreign currency
- Gifts: create themed wallets for birthdays, holidays, or teachers
- Organization: use it for receipts, coupons, or craft supplies
Caring for your fabric wallet is simple. Spot clean as needed, or gently hand wash and air dry. Iron on low to remove any creases or wrinkles over time.
Now you have a gorgeous, handmade wallet that’s not only functional but also reflects your personal style!
FAQ – 11-pocket fabric wallet – Free pattern
Is this pattern beginner-friendly?
Yes! The 11-pocket fabric wallet – Free pattern includes simple steps and clear instructions. If you know basic sewing techniques, you’ll have no trouble following along.
Can I customize the number of pockets?
Absolutely. While this pattern includes 11 pockets, you can reduce or add more depending on your needs. It’s very flexible.
Do I need a special sewing machine?
No special machine is required. A basic home sewing machine with a straight stitch and zipper foot will do just fine.
How long does it take to make this wallet?
Most sewists complete this project in about 3 to 5 hours, depending on skill level and optional embellishments.
What kind of fabric works best for this wallet?
100% cotton quilting fabric is recommended. It’s easy to sew, durable, and available in many prints.
Can I sell wallets made from this pattern?
If you’re using this free pattern for personal or small-scale use, you can usually sell finished items. Always check any usage notes provided by the pattern designer.
Conclusion
Creating your own 11-pocket fabric wallet – Free pattern is not only a practical sewing project but also a fun way to express your creativity. We covered everything from material selection to sewing and finishing techniques, helping you bring a professional-quality wallet to life using simple tools and skills.
With space for cards, cash, coins, and more, this wallet is perfect for everyday use or as a handmade gift. By following this tutorial, you’ve learned how to combine beauty and function in one amazing project.
VIDEO TUTORIAL
💬 We’d love to hear from you! Did you try this pattern? Leave a comment below with your experience and any suggestions you have for future tutorials. Your feedback keeps our sewing community strong and inspired! 🧵


