
Pie Carrier Sewing Pattern

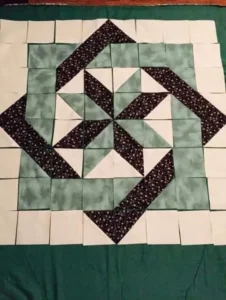
The Cross & Crown – Quilt Pattern is a traditional design that brings together bold shapes and a beautiful blend of colors, making it a favorite among quilters of all skill levels.
This design, known for its simplicity and elegance, incorporates a series of interconnected crosses and crown-like motifs, creating a striking visual effect that is both balanced and dynamic.
Whether you’re a seasoned quilter or a beginner, this quilt pattern offers a wonderful opportunity to hone your skills and create a stunning piece of art.
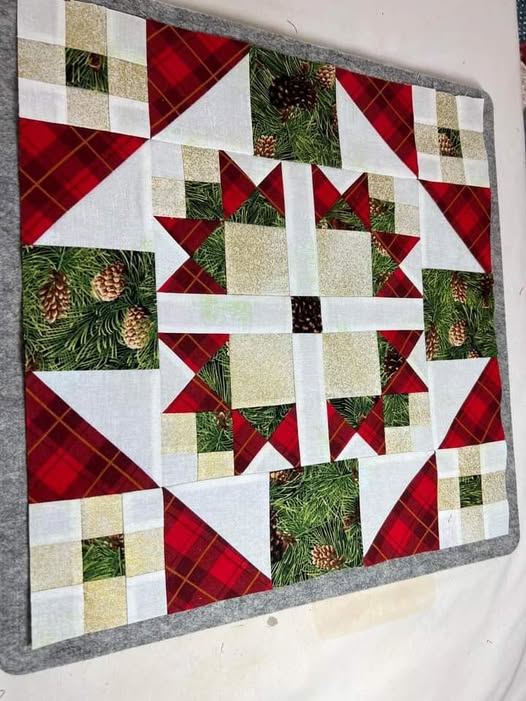
The beauty of the Cross & Crown – Quilt Pattern lies in its versatility. It can be adapted to fit different quilting styles, color schemes, and fabric choices, making it a go-to pattern for various projects. From bed quilts to wall hangings and throw blankets, this pattern is perfect for a wide range of quilting endeavors.
Moreover, the design’s intricate yet straightforward structure allows quilters to experiment with different fabric combinations and quilting techniques.
In this article, we will guide you through the process of creating your own Cross & Crown – Quilt Pattern, breaking down the steps and offering helpful tips along the way.
We will also discuss the materials you’ll need and some common mistakes to avoid when working with this design. Let’s dive into how to bring this classic pattern to life and create a quilt that you will be proud to showcase.
Before you begin working on your Cross & Crown – Quilt Pattern, it’s important to gather all the necessary materials. Having the right supplies at hand will help you avoid frustration and ensure that your quilt comes out looking professional.
First, you will need a variety of quilt fabric in different colors. The design of the Cross & Crown pattern typically uses contrasting fabrics to make the cross and crown shapes stand out. You’ll need enough fabric for the background and the shapes, so be sure to calculate the required yardage based on the size of your quilt.
For cutting your fabric, a rotary cutter and cutting mat are essential tools. These tools help ensure that your fabric pieces are cut precisely, which is crucial when working with a pattern that relies on symmetry, like the Cross & Crown – Quilt Pattern. You’ll also need a ruler to measure and cut the fabric into the right shapes and sizes.
A sewing machine is necessary to assemble the quilt blocks, and cotton thread is recommended for sewing, as it provides a smooth finish and durability. You’ll also want a quilt batting to add thickness and warmth to your quilt, and quilt backing fabric for the reverse side.
Finally, have some pins on hand to hold your fabric pieces in place as you sew them together. A pressing iron will be useful for pressing your seams flat after each step to ensure that the fabric pieces align perfectly.
Once you have all your materials ready, it’s time to start creating the Cross & Crown – Quilt Pattern. The first step is to cut your fabric into the required shapes. The Cross & Crown design is typically made up of squares, triangles, and diamonds. Make sure to follow the pattern closely to cut each piece to the correct size.
Start by cutting the background fabric into squares that will form the foundation of your quilt. The Cross & Crown design uses a series of blocks, so cutting the right number of background squares is essential. Next, cut the fabric for the cross and crown shapes. These pieces should be a different color from the background to create a contrast that will make the pattern stand out.
Once your pieces are cut, it’s time to start piecing them together. Begin by arranging the cross blocks on a flat surface. Lay out the pieces in the correct pattern, making sure that the cross shapes are aligned properly. Pin the pieces together and start sewing them using a quarter-inch seam allowance, which is standard for most quilting projects.
After you’ve sewn the cross blocks, move on to the crown-shaped pieces. These pieces are usually made up of triangles or diamonds that form a crown-like motif. Arrange these pieces around the cross blocks to complete the full design. Pin and sew each piece carefully, checking that everything aligns as you go.
Once all the blocks are sewn, you can begin assembling the quilt top by joining the individual blocks together. Use the same seam allowance as before and make sure that the seams match up neatly.
Creating a quilt with perfect symmetry, such as the Cross & Crown – Quilt Pattern, can be challenging, but with the right techniques, you can achieve a balanced and beautiful design. Here are some helpful tips to guide you through the process.
One of the most important things to remember when working with this pattern is to ensure that your fabric pieces are cut accurately. Use a rotary cutter and ruler to cut your fabric into the precise shapes needed for the design. Even small discrepancies in the size of your fabric pieces can throw off the symmetry of the entire quilt.
Another tip is to press your seams as you sew. Pressing the seams flat after each step ensures that your blocks lay smoothly and that the pieces line up perfectly. Use a pressing iron with steam to press your seams without distorting the fabric.
When sewing the blocks together, pay close attention to the alignment of the seams. If necessary, use a matching thread to make your seams less noticeable and create a smooth, seamless look. Take your time and don’t rush through the process.
Also, don’t hesitate to rearrange your blocks before sewing them together. Lay them out on a flat surface and adjust the positioning of the blocks until you are happy with the overall design. This will help ensure that your Cross & Crown pattern is symmetrical and visually balanced.
If you’re unsure about your progress, take a step back and evaluate your work from a distance. This will help you see if the design looks cohesive and if there are any areas that need adjustment.
Once your quilt top is complete, it’s time to move on to the quilting and finishing process. The first step is to add batting to the quilt top, which will provide warmth and structure to your quilt. Lay the quilt top on a flat surface and place the batting underneath, making sure that it’s centered.
Next, add the quilt backing fabric. The backing fabric should be slightly larger than the quilt top to allow for easy quilting. Once the backing is in place, pin the layers together and begin quilting. You can either quilt by hand or use a sewing machine to sew along the seams of the blocks. Be sure to quilt evenly across the entire quilt to create a consistent texture.
After quilting, trim any excess fabric from the edges of the quilt, making sure to leave enough room for binding. The final step is to add quilt binding around the edges to finish off the quilt. Bind the edges carefully, making sure the fabric is securely attached.
Once the quilt binding is in place, press the edges flat to create a neat finish. Your Cross & Crown – Quilt Pattern quilt is now ready to be enjoyed!
Q: What fabrics are best for the Cross & Crown quilt?
A: Cotton fabrics are ideal for the Cross & Crown – Quilt Pattern due to their durability, ease of use, and smooth finish. You can use solid colors for a bold contrast or go for patterned fabrics to add visual interest.
Q: How can I make the pattern more complex?
A: To make the Cross & Crown pattern more intricate, try using additional fabric colors or experimenting with different block sizes. You can also add more detailed quilting designs for a unique touch.
Q: Is the Cross & Crown pattern suitable for beginners?
A: Yes, the Cross & Crown – Quilt Pattern is suitable for beginners as long as you follow the instructions carefully and practice your sewing skills. Start with smaller blocks before attempting a full-size quilt.
Q: Can I use this pattern for a wall hanging?
A: Absolutely! The Cross & Crown pattern works well for wall hangings, table runners, or any other small quilt projects. You can adjust the block size to fit your project’s dimensions.
Q: How do I ensure my seams are straight?
A: To keep your seams straight, use a quarter-inch seam allowance and sew slowly. Press each seam flat before adding the next piece to ensure accuracy.
Join our VIP broadcast list and gain access to exclusive patterns, all for free. As a VIP member, you’ll receive the best patterns daily, delivered directly to your device. ✨📱 It’s a unique opportunity to stay up-to-date with the latest trends and designs, curated just for you. Don’t miss out on enhancing your projects and discovering new inspirations with the best patterns every day! 🎨🔝
The Cross & Crown – Quilt Pattern is a timeless design that combines elegance with simplicity, making it a great choice for quilters of all levels.
By following the step-by-step instructions, gathering the right materials, and practicing your techniques, you can create a beautiful quilt that is sure to be a cherished heirloom. We hope this guide has been helpful in getting you started on your quilt-making journey.
Please share your thoughts, experiences, and suggestions in the comments below! Happy quilting!


