
Pie Carrier Sewing Pattern

If you love sewing and vintage fashion, you are going to fall in love with this tutorial on How to Make Retro Style Fabric Bags: Complete Step-by-Step Guide.
These charming bags are not only fashionable but also practical and environmentally friendly. Whether you’re looking to create a stylish accessory for yourself or a thoughtful handmade gift, this guide has everything you need.
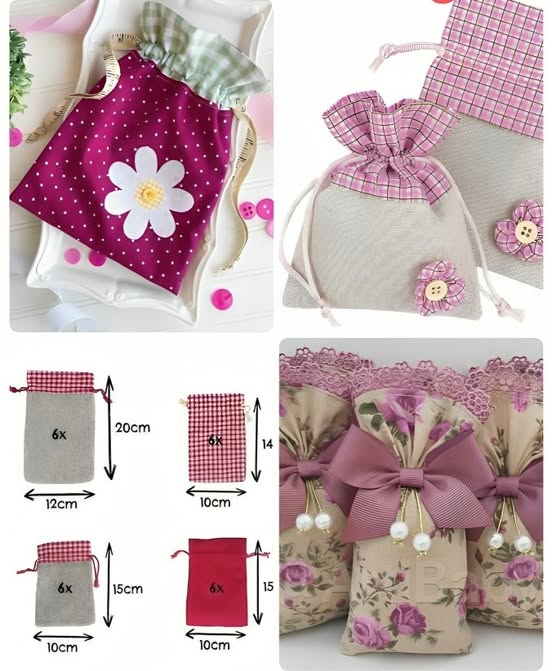
The appeal of retro-style fabric bags lies in their timeless design and endless customization possibilities. You can choose from vibrant floral patterns, classic polka dots, or bold geometric prints.
This How to Make Retro Style Fabric Bags: Complete Step-by-Step Guide will show you how to transform simple fabric into stunning bags that stand out wherever you go.
This project is perfect for beginners and experienced crafters alike. With clear steps and helpful tips, you’ll confidently create your own bag from start to finish.
Let’s dive into this creative journey together and discover how to make retro style fabric bags that are both beautiful and functional.
Before you start sewing, it’s essential to gather all the necessary materials listed in this How to Make Retro Style Fabric Bags: Complete Step-by-Step Guide. Having everything ready will make the process smoother and more enjoyable.
The first thing you need is fabric. Choose medium-weight cotton, canvas, or linen for durability. Retro prints like polka dots, stripes, florals, and paisleys are ideal for achieving that vintage look.
You’ll also need matching thread. High-quality cotton or polyester thread works well for sewing fabric bags. Make sure the color complements or contrasts beautifully with your chosen fabric.
A sewing machine is highly recommended for this project. While hand sewing is possible, a machine will provide stronger seams and a more professional finish.
Interfacing is an important material that helps the bag hold its shape. Fusible interfacing is easy to apply with an iron and provides stability to the fabric.
You’ll need basic sewing tools like scissors, fabric pins, clips, a measuring tape, and a fabric marking pen. These tools are essential for accurate cutting and sewing.
Finally, handles or straps can be made from fabric, cotton webbing, or faux leather. You may also want to add extras like buttons, snaps, or zippers to personalize your retro bag.
The next step in this How to Make Retro Style Fabric Bags: Complete Step-by-Step Guide is cutting and preparing your fabric pieces. Precision in this stage ensures your bag comes together perfectly.
Begin by measuring and cutting the main body pieces of the bag. A common size is 16 inches wide by 14 inches tall, but you can adjust this depending on your preference.
Cut two pieces of fabric for the exterior and two pieces for the lining. If you’re using interfacing, cut two additional pieces matching the exterior fabric to provide structure.
For the bag handles, cut two strips of fabric or webbing. A typical length is 24 inches each, but you can make them shorter or longer based on how you like to carry your bag.
If your design includes a pocket, cut a smaller piece of fabric. An interior or exterior pocket can be a practical and stylish addition to your retro bag.
Iron the fabric and the interfacing. Apply the interfacing to the wrong side of the exterior fabric pieces following the manufacturer’s instructions. This step adds strength and durability.
Use fabric pins or clips to hold pieces together as you prepare them for sewing. Mark any spots where you plan to attach pockets, handles, or decorative elements.
Now comes the most exciting part of this How to Make Retro Style Fabric Bags: Complete Step-by-Step Guide—sewing your pieces together. This is where your bag starts taking shape.
Start by sewing the pocket, if you’re adding one. Fold the edges under, topstitch the top edge, and then sew the remaining three sides onto the lining or exterior piece.
Next, attach the handles. Pin the ends of each strap to the top edges of the exterior fabric, making sure they are evenly spaced and not twisted. Stitch them securely.
With right sides facing each other, sew the two exterior pieces together along the sides and bottom. Use a straight stitch and reinforce the corners for extra strength.
Repeat the same process for the lining pieces, but leave a 3-4 inch opening at the bottom. This gap will be used later to turn the bag right side out.
If you want to add a boxed bottom for more depth, pinch each corner flat, measure about 2 inches from the tip, and sew straight across. Cut off the excess fabric.
Once both the exterior and lining are sewn, place the exterior bag inside the lining, right sides together. Match the seams, pin, and sew around the top edge of the bag.
In the final stage of this How to Make Retro Style Fabric Bags: Complete Step-by-Step Guide, it’s time to add finishing touches that give your bag a polished, professional look.
Turn the bag right side out by pulling it through the gap you left in the lining. Push out all the corners and edges so the bag takes its proper shape.
Sew the opening in the lining closed. You can either topstitch it shut or hand sew it with an invisible ladder stitch for a cleaner finish.
Push the lining into the bag, smoothing it out so it fits perfectly inside. Align the top edges neatly to prepare for the final topstitching.
Topstitch around the entire top edge of the bag. This not only secures the lining in place but also adds a decorative touch that enhances the overall look.
If you’d like, add embellishments such as vintage buttons, decorative stitching, iron-on patches, or lace trims. These small details can really amplify the retro vibe.
Test the strength of your handles and seams to make sure everything is secure. Your beautiful retro-style fabric bag is now complete and ready to be used or gifted.
Is this retro fabric bag project suitable for beginners?
Yes! This project is beginner-friendly and a great introduction to sewing bags. It uses basic stitches and simple construction techniques.
What is the best fabric for making retro-style bags?
Medium-weight cotton, canvas, and linen are excellent choices. Look for fabrics with vintage-inspired prints like polka dots, florals, or geometric designs.
Do I need a sewing machine for this project?
While a sewing machine makes the process faster and the seams stronger, you can complete this project by hand if you are comfortable with basic stitching.
How do I make the bag sturdier?
Adding interfacing to the exterior fabric pieces provides structure and durability. You can also double-stitch stress points like the handles.
Can I add zippers or closures?
Absolutely! You can customize your bag with zippers, magnetic snaps, or buttons. These additions add security and style.
What size should I make the bag?
The suggested size is 16 inches wide by 14 inches tall, but you can easily adjust the dimensions to create a larger tote or a smaller handbag depending on your needs.
In this guide on How to Make Retro Style Fabric Bags: Complete Step-by-Step Guide, we’ve walked through every stage of creating a beautiful, functional, and vintage-inspired bag. From gathering materials to sewing the pieces together and adding those final custom touches, you now have the knowledge and confidence to create your own retro fabric bag.
Handmade bags are not only stylish but also sustainable and deeply personal. Whether you’re making one for yourself, as a gift, or to sell at craft fairs, this project is both rewarding and practical.
I would love to hear your thoughts! Share your experience with this tutorial, leave your honest opinion, and let me know if you have suggestions or ideas for future guides. Your feedback helps this crafting community grow and inspires even more creativity. Happy sewing!


