
Pie Carrier Sewing Pattern

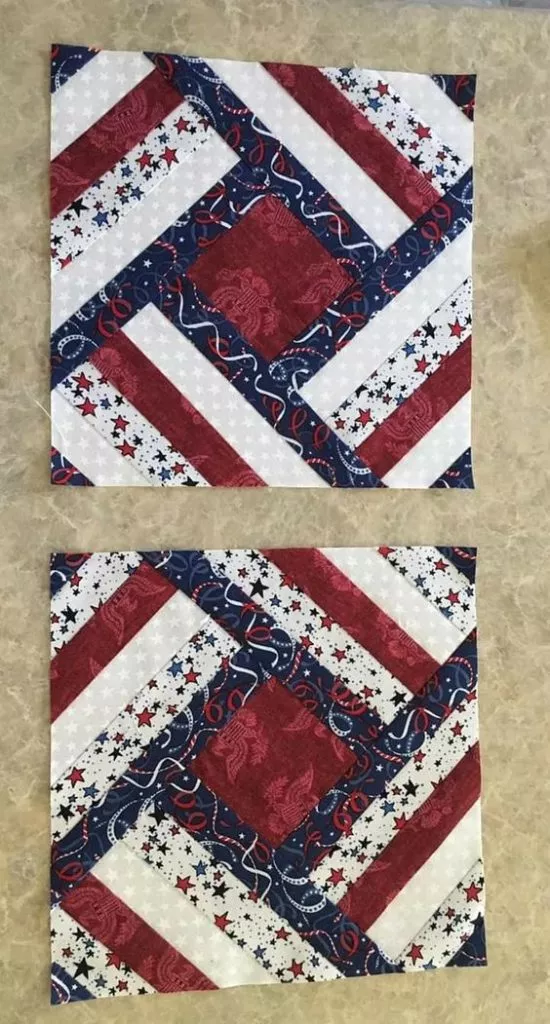
The Indian Trail Quilt Block – Free Pattern is a beautiful and classic design that has been admired by quilters for generations.
With its distinctive geometric pattern, this block brings together a rich history and a modern aesthetic, making it a perfect choice for any quilting project.
Whether you are a beginner or an experienced quilter, this free pattern will guide you step-by-step to create stunning quilts with an intricate design.

Image from google.
This block’s unique arrangement features a series of triangles that come together to form a cohesive and visually captivating layout.
The simplicity of the Indian Trail Quilt Block – Free Pattern makes it easy to customize, and it works well with various fabric combinations, allowing you to create quilts that reflect your personal style.
In this tutorial, we’ll walk you through the process of making the Indian Trail Quilt Block, from choosing the right materials to assembling the pieces and creating the final quilt. Let’s dive into the details and start quilting!
Before starting your Indian Trail Quilt Block – Free Pattern project, it’s important to gather the right materials. The following supplies will ensure a smooth and successful quilting experience:
For the best results, choose quilting cotton fabric. You’ll need a variety of fabric colors to create the pattern. Typically, a combination of light and dark fabrics works well for this block.
A rotary cutter and mat will help you cut fabric pieces accurately and efficiently. This is especially important when working with precise angles and measurements.
A clear quilting ruler is essential for measuring and cutting the fabric pieces according to the pattern.
Use a high-quality cotton thread to match your fabric. It’s best to choose a neutral color thread that blends well with your fabric.
For any last-minute trimming, sharp fabric scissors will come in handy.
Pressing your fabric pieces is crucial to achieve crisp seams and precise edges. An iron and ironing board are essential for this process.
A sewing machine with a quarter-inch foot is ideal for stitching the blocks together. If you don’t have a machine, you can hand-sew the blocks, but using a sewing machine speeds up the process.
Now that you have all the necessary materials, it’s time to start stitching the Indian Trail Quilt Block – Free Pattern. Follow these detailed steps to create your block:
Begin by cutting your fabric into the required sizes according to the pattern. Typically, this block involves cutting squares and triangles. Make sure your cuts are precise, as accuracy is key to achieving a perfect block.
Once your fabric is cut, you’ll begin sewing the triangles that form the main components of the Indian Trail Quilt Block. Start by sewing two triangles together to create a square unit. Repeat this process with different fabric pieces to form the larger block design.
After all the triangles are sewn together, begin assembling the pieces into the block. Start by stitching the rows together, and then join the rows to complete the block.
Once the block is assembled, press the seams with an iron to flatten them. Pressing helps the block maintain its shape and ensures that all the seams are neat and crisp.
After pressing, use your quilting ruler to square up the block. This step ensures that the block is perfectly aligned and has equal sides, which is essential when assembling multiple blocks for a quilt.
To complete your quilt, repeat the process to make additional Indian Trail Quilt Blocks. Once you have enough blocks, you can arrange them in a layout that suits your design.
While the traditional Indian Trail Quilt Block – Free Pattern is beautiful on its own, there are many ways to customize it and make it unique to your style. Here are some ideas to consider:
You can create different moods by experimenting with fabric choices. Try using a monochromatic color scheme, or mix different colors for a bold and vibrant look.
If you want to add more detail to your quilt, consider adding a border around each Indian Trail Quilt Block. This can frame the block and give it a more polished appearance.
Instead of following the standard grid layout, try rotating or arranging the blocks in different orientations. This can give your quilt a dynamic and unique look.
You don’t have to stick to traditional quilting cotton. Use fabrics like flannel, linen, or even denim for a different texture and feel.
To make your quilt stand out even more, add embellishments like embroidery, appliqué, or buttons to some of the blocks. These can be a fun way to showcase your creativity.
You can add sashing (strips of fabric between blocks) to give the quilt a more structured and organized appearance. Sashing also allows for more design possibilities.
The Indian Trail Quilt Block – Free Pattern is an excellent choice for quilters of all levels, and there are several reasons why this pattern is so popular:
The Indian Trail Quilt Block is simple yet striking. It is versatile and can be adapted to a variety of projects, including bed quilts, wall hangings, and throw quilts.
If you have leftover fabric scraps, this pattern is a great way to use them up. The block’s design allows you to mix and match different fabrics, making it ideal for scrap quilts.
The Indian Trail Quilt Block has deep historical roots and is a tribute to Native American culture. By making this block, you’re connecting with a tradition that has been passed down for generations.
Although the block may look intricate, it is relatively quick to make. This is perfect for quilters looking for a project that provides both satisfaction and results.
The Indian Trail Quilt Block can be resized depending on your project needs. Whether you’re making a small table runner or a large bed quilt, the block can be adjusted to suit the dimensions you want.
This block is a great choice for beginners. With clear instructions and straightforward steps, you’ll be able to create a stunning quilt in no time.
Q: Is this pattern suitable for beginners?
A: Yes, the Indian Trail Quilt Block – Free Pattern is beginner-friendly. The instructions are simple to follow, and the pattern doesn’t require advanced techniques.
Q: What kind of fabric should I use?
A: Quilting cotton is the best choice, but you can also experiment with other fabric types such as flannel or linen for a different texture.
Q: How do I assemble multiple blocks into a quilt?
A: After making enough blocks, arrange them in your desired layout, then sew the blocks together. Add sashing if desired for a more structured quilt.
Q: Can I make a larger version of this block?
A: Yes, you can resize the block by adjusting the measurements and cutting larger fabric pieces.
Q: How do I maintain the quilt after it’s finished?
A: Once your quilt is complete, wash it gently on a cool cycle and tumble dry on low heat to maintain its quality and color.
Q: Can I add appliqué to the blocks?
A: Absolutely! Adding appliqué designs is a great way to personalize the Indian Trail Quilt Block.
Join our VIP broadcast list and gain access to exclusive patterns, all for free. As a VIP member, you’ll receive the best patterns daily, delivered directly to your device. ✨📱 It’s a unique opportunity to stay up-to-date with the latest trends and designs, curated just for you. Don’t miss out on enhancing your projects and discovering new inspirations with the best patterns every day! 🎨🔝
The Indian Trail Quilt Block – Free Pattern is a fantastic project for quilters of all skill levels. With its simple design, customizable features, and rich history, it’s a pattern that you’ll enjoy making and displaying for years to come. Whether you’re using it in a traditional quilt or adding your own unique touch, this block will surely become a favorite in your quilting collection.
Feel free to share your experiences with this pattern in the comments below. We’d love to hear your feedback and any suggestions for future tutorials!


