
The Milky Way Quilt Block Diagram is a stunning design that represents the beauty of our galaxy through quilting. Inspired by the swirling motion of stars, this block creates a mesmerizing pattern perfect for quilters looking to create a masterpiece.
Whether you’re an experienced quilter or a beginner, the Milky Way Quilt Block will challenge your skills and leave you with a beautiful and intricate design to showcase.
In this article, we will guide you through the steps needed to create your very own Milky Way Quilt Block Diagram. From gathering your materials to piecing the block together, we’ll cover everything you need to know to successfully complete this project.
Whether you’re making a quilt for yourself or as a gift, this pattern is a great way to experiment with different fabrics and colors to capture the essence of the Milky Way.
Before diving into the details of the pattern and construction, it’s important to understand the basics of the Milky Way Quilt Block.
This block often features swirling shapes and star-like elements that mimic the cosmic pattern of our galaxy. The design can be modified to suit your preferences, and with the right approach, you’ll have a quilt block that is both beautiful and uniquely yours.
Materials Needed for the Milky Way Quilt Block
Creating the Milky Way Quilt Block Diagram requires a few key materials, which will help ensure that the block comes together smoothly. The following list includes everything you’ll need to complete the pattern:
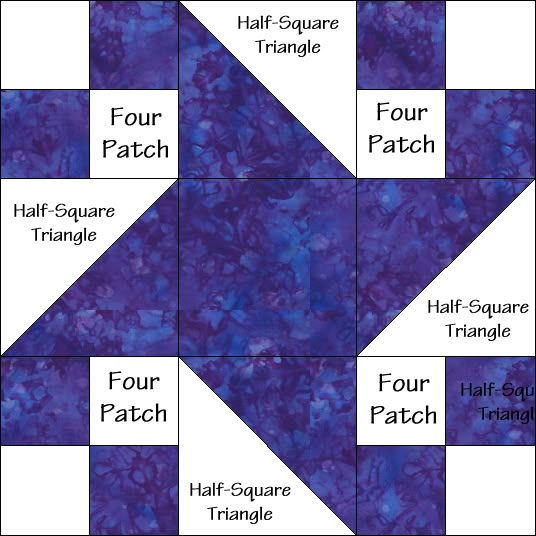
- Fabric: Choose a variety of fabrics in different colors, including dark blues, purples, and blacks to mimic the night sky, as well as light fabrics like whites and yellows for the stars and swirling elements.
- Thread: Opt for a strong cotton thread that matches your fabric. Consider using contrasting threads for the swirl elements to make them stand out.
- Rotary Cutter and Mat: These tools are essential for accurately cutting your fabric pieces into the correct shapes and sizes.
- Quilting Ruler: A quilting ruler will help ensure that your fabric pieces are measured and cut evenly for precision.
- Sewing Machine: A reliable sewing machine will make the process quicker and easier, but hand sewing is also an option if you prefer.
- Batting: The batting will give your quilt a plush feel and make it more durable.
Once you have gathered your materials, it’s time to start preparing your fabric for the Milky Way Quilt Block.
Cutting the Fabric for the Milky Way Quilt Block
The first step in creating the Milky Way Quilt Block Diagram is cutting your fabric into the right shapes. To begin, you’ll need to cut the fabric into small squares or triangles for the various elements of the block. The exact measurements will depend on the design you choose, but the key is to ensure that your pieces are cut precisely to maintain symmetry and alignment throughout the block.
Start by cutting the background fabric in larger pieces, as this will form the outer parts of the block. Then, cut smaller pieces for the swirling shapes and stars. These will need to be carefully arranged to create the movement and pattern that defines the Milky Way. Don’t forget to cut a few additional pieces just in case you need them later.
Once you’ve cut all the necessary pieces, arrange them on your work surface to visualize the pattern and ensure you’re happy with the design before you begin sewing. This will give you a chance to make any adjustments before committing to the final layout.
Assembling the Milky Way Quilt Block
Now that your fabric is cut and arranged, it’s time to start assembling the Milky Way Quilt Block. Begin by piecing together the smaller components, like the swirling elements or star shapes. Use a consistent seam allowance throughout the project, typically ¼ inch, to ensure everything fits together properly.
As you sew the pieces together, be mindful of how the fabric pieces align. The swirling pattern of the Milky Way block can be tricky, so take your time and pin your fabric pieces in place before sewing them. This will help prevent any shifting or uneven seams that could affect the final appearance of the quilt.
After you’ve sewn together the smaller pieces, start attaching them to the larger background pieces. Continue to carefully match the seams and check your progress as you go along. Press the seams flat after each step to ensure the block stays neat and precise.
Adding the Finishing Touches
Once your Milky Way Quilt Block is assembled, it’s time to add the finishing touches that will bring the entire design to life. Press the entire block to remove any wrinkles or creases. This step will help the block lay flat and make it easier to sew into a larger quilt.
If you’re making a quilt top, consider adding a border around the Milky Way Quilt Block to frame it and provide a cohesive look. A solid or patterned fabric border will complement the swirling design and give the quilt a polished finish. Once the border is attached, you can quilt the block and add the backing and batting.
Lastly, bind the quilt to finish it off. This is the final step that will give your Milky Way Quilt Block a clean edge and prevent the fabric from fraying over time.
FAQ – Common Questions About the Milky Way Quilt Block
Q1: Can I use any fabric for the Milky Way Quilt Block?
Yes, you can use any fabric you like, but for the best effect, choose dark fabrics like black, navy, or purple for the background, and lighter fabrics like whites, yellows, or light blues for the stars and swirling elements.
Q2: How do I make my Milky Way Quilt Block larger?
If you want a larger quilt, you can adjust the size of the fabric pieces accordingly. Simply increase the dimensions of the blocks and make sure the proportions remain consistent.
Q3: What type of thread should I use for this quilt?
Use high-quality cotton quilting thread to ensure durability and a neat finish. You can also use a contrasting thread for the swirl patterns to make them stand out.
Q4: How can I make my quilt block more intricate?
To add more detail to your Milky Way Quilt Block, consider using smaller pieces for the stars or creating additional swirl patterns. You could also experiment with different fabric textures or add embroidery to enhance the design.
Q5: Can I make a quilt with multiple Milky Way Quilt Blocks?
Absolutely! You can create a larger quilt by combining multiple Milky Way Quilt Blocks. Just make sure to align the blocks properly and consider adding sashing or borders to separate them.
Join our VIP broadcast list and gain access to exclusive patterns, all for free. As a VIP member, you’ll receive the best patterns daily, delivered directly to your device. ✨📱 It’s a unique opportunity to stay up-to-date with the latest trends and designs, curated just for you. Don’t miss out on enhancing your projects and discovering new inspirations with the best patterns every day! 🎨🔝
Conclusion
Creating a Milky Way Quilt Block Diagram is a rewarding project that allows you to combine creativity with technique. By carefully selecting your fabrics, cutting them with precision, and assembling the pieces thoughtfully, you can create a quilt block that captures the beauty and mystery of the galaxy. Whether you’re a beginner or an experienced quilter, this pattern is a wonderful way to practice new skills and create a stunning piece that will impress.
We hope this guide has been helpful in walking you through the process of making your own Milky Way Quilt Block. If you have any questions or suggestions, feel free to share them in the comments below. We’d love to hear about your quilting experiences and see your finished projects!


