
Crochet Multi-Purpose Blouse, Shawl, Runner Model

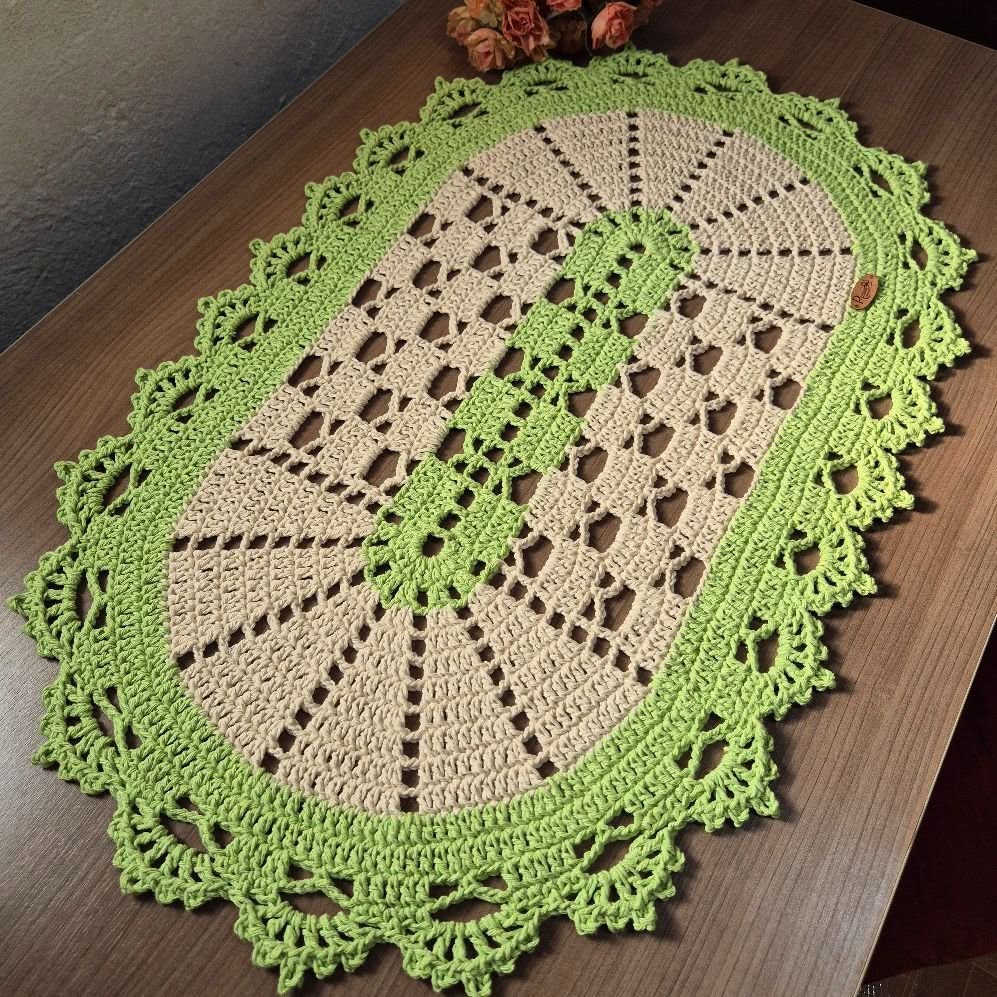
If you’re looking to add a touch of elegance and comfort to your home, the Emerald Oval Rug – Free Pattern is the perfect crochet project. This stunning rug blends beauty, practicality, and handmade charm, making it an excellent addition to any space.
Whether you’re sprucing up your living room, bedroom, or entryway, this beautiful oval rug adds warmth and personality.
The Emerald Oval Rug – Free Pattern is designed to be beginner-friendly yet sophisticated enough for experienced crocheters.
With simple stitches and repetitive rounds, this pattern allows you to create a functional piece that stands out as a decorative focal point. Plus, the oval shape brings a soft, organic feel that complements modern, rustic, or classic interiors.
Working on the Emerald Oval Rug – Free Pattern is not only satisfying but also a wonderful way to express your creativity. The rich emerald color evokes feelings of nature, growth, and tranquility, while the oval shape provides versatility for different spaces.
This guide will help you through the steps, materials, and tips needed to create this beautiful rug.
The Emerald Oval Rug – Free Pattern is more than just a crochet project—it’s an opportunity to craft something that elevates your home decor. This rug pattern combines simple crochet stitches in an elegant oval shape that can fit in various spaces.
The pattern primarily uses basic stitches like single crochet, double crochet, and slip stitches, making it suitable for both beginners and advanced crocheters. The repetitive nature of the rounds helps build consistency in your stitch tension and technique.
One of the best aspects of the Emerald Oval Rug – Free Pattern is how customizable it is. You can adjust the size, color, and texture to match your home’s aesthetic. While emerald green is a beautiful choice, you can easily adapt the pattern to other colors.
This rug is designed to be durable and practical. Made with sturdy yarn, it can withstand foot traffic while maintaining its shape and beauty. It’s perfect for adding a cozy touch to wooden floors, tile surfaces, or even outdoor patios.
The oval shape provides a soft and inviting look that works well in spaces where square or rectangular rugs might feel too harsh or rigid. Its flowing lines naturally draw the eye and create balance in a room.
Additionally, the Emerald Oval Rug – Free Pattern is a sustainable choice. By making your own rug, you reduce waste and have full control over the materials, ensuring it aligns with your personal values and style.
To start the Emerald Oval Rug – Free Pattern, you’ll need to gather the right materials. Having everything prepared before you begin will make the process smoother and more enjoyable.
The most common yarn used for this rug is chunky cotton or recycled t-shirt yarn. These options are durable, easy to clean, and offer excellent texture for rugs that are both functional and stylish.
Choose a large crochet hook, usually ranging from 8mm (L) to 12mm (O), depending on the thickness of your yarn. The larger hook helps create a looser stitch that allows the rug to lay flat and drape beautifully.
Other essentials include a pair of sharp scissors and a large-eye yarn needle. The needle will be used to weave in the ends and secure any loose stitches at the end of your project.
If you want extra durability or a non-slip feature, consider using a rug gripper or anti-slip fabric underneath the finished piece. This is particularly useful if the rug will be placed on smooth surfaces like tile or hardwood.
Optional decorations like tassels, pom-poms, or surface embroidery can add a personal touch to your Emerald Oval Rug – Free Pattern, making it unique to your home style.
Lastly, it’s helpful to have a tape measure handy to check the dimensions of your rug as you work. This ensures the rug fits perfectly in the intended space and helps maintain even shaping.
Creating the Emerald Oval Rug – Free Pattern involves following a series of rounds that gradually expand to form the elegant oval shape. Here’s how to get started.
Begin with a foundation chain that sets the width of the rug’s center. The number of chains depends on how wide you want the rug to be. This chain acts as the straight center line of the oval.
Work single crochet stitches along one side of the chain, then add increases at the end of the chain to start forming the rounded curve. Continue crocheting along the opposite side of the foundation chain to mirror the curve.
As you build each round, place increases (usually two or three stitches in one space) at each curve’s end. This allows the rug to expand outward while maintaining the smooth oval shape.
The main body of the rug alternates between straight stitches along the sides and increases at the curves. This repetitive sequence keeps the project beginner-friendly while ensuring a beautiful, symmetrical finish.
Keep checking your stitch count to make sure the rug is laying flat. If it starts to curl or ripple, you may need to adjust the number of increases in the curves or loosen your tension slightly.
Finish the rug with a clean edge, such as a round of slip stitches or a decorative scalloped border. This step gives the Emerald Oval Rug – Free Pattern a polished and professional look while reinforcing the edges for durability.
Crocheting the Emerald Oval Rug – Free Pattern is a rewarding experience, and these tips will help you achieve the best results.
Choose the right yarn for your needs. Cotton or recycled yarn works best for rugs because it’s strong and easy to clean. Avoid overly stretchy yarn, as it may cause the rug to lose its shape over time.
Pay attention to tension. A consistent tension helps the rug lay flat and look even. If you tend to crochet tightly, use a larger hook or consciously loosen your stitches.
Follow the increase pattern carefully at the ends of the oval. Skipping or adding too many increases can lead to curling or wavy edges. Adjust based on how your rug looks as you go.
Use stitch markers to track the ends of the oval and where increases should occur. This simple tool can prevent confusion and help maintain the correct stitch count.
Consider blocking the finished rug if the edges seem uneven. Lightly dampening the rug and pinning it into shape can help smooth out any minor imperfections.
Finally, personalize your Emerald Oval Rug – Free Pattern with colors, textures, or embellishments. Whether you add a contrasting border, fringe, or applique, these details make your handmade rug truly one-of-a-kind.
1. Is the Emerald Oval Rug – Free Pattern suitable for beginners?
Yes, this pattern is beginner-friendly. It mainly uses simple stitches like single crochet and double crochet, with easy-to-follow increases for the oval shape.
2. How long does it take to crochet the Emerald Oval Rug?
The time depends on the size and your crochet speed. On average, it takes 5 to 10 hours to complete a medium-sized rug.
3. What type of yarn is best for the Emerald Oval Rug – Free Pattern?
Chunky cotton yarn or recycled t-shirt yarn is ideal. These materials are durable, washable, and give the rug a nice texture.
4. Can I adjust the size of the rug?
Yes, you can easily make the rug larger or smaller by adjusting the starting chain and continuing rounds until you reach the desired size.
5. How do I prevent the rug from curling?
Make sure to evenly distribute increases on both ends of the oval. If it starts to curl, try using a larger hook or adding extra increases.
6. Is the rug washable?
Yes, if made from cotton or t-shirt yarn, the rug is machine washable on a gentle cycle. Handwashing is recommended for preserving its shape longer.
The Emerald Oval Rug – Free Pattern is a delightful project that brings beauty, functionality, and creativity into your home. Whether you are new to crochet or have years of experience, this pattern offers an enjoyable crafting journey with a stunning result.
We’ve covered everything from understanding the design, gathering materials, step-by-step instructions, and helpful tips to ensure your rug turns out perfect. Plus, the FAQ addresses common questions to guide you further.
I hope you feel inspired to try the Emerald Oval Rug – Free Pattern and enjoy every step of making it. Once you finish, I’d love to hear your honest feedback and any suggestions you have. Share your thoughts and help us continue building a community of creative makers!


