
Pie Carrier Sewing Pattern

If you’ve ever wanted to carry your essentials in something cute, handmade, and functional, learning how to make a mini tote bag with side pockets – step by step is the perfect DIY project for you.
Tote bags are a beloved craft for beginners and seasoned makers alike. They are versatile, customizable, and easy to sew with basic materials and tools.
The mini tote bag is a compact version of the classic tote, and adding side pockets gives it extra functionality.
Whether you need a small bag for running errands, organizing supplies, or gifting a handmade creation, this project will walk you through everything you need—from cutting your fabric to the final topstitch.
This guide will break down each stage in a friendly and clear way, so even if you’re new to sewing, you’ll feel confident creating your own tote.
Plus, you’ll learn how to personalize your project by choosing fabrics, adding lining, and finishing it like a pro. Let’s dive into the process of how to make a mini tote bag with side pockets – step by step.
Before we start sewing, let’s gather all the materials and prepare the fabric. Being organized from the beginning helps the project go smoothly and avoids unnecessary frustration.
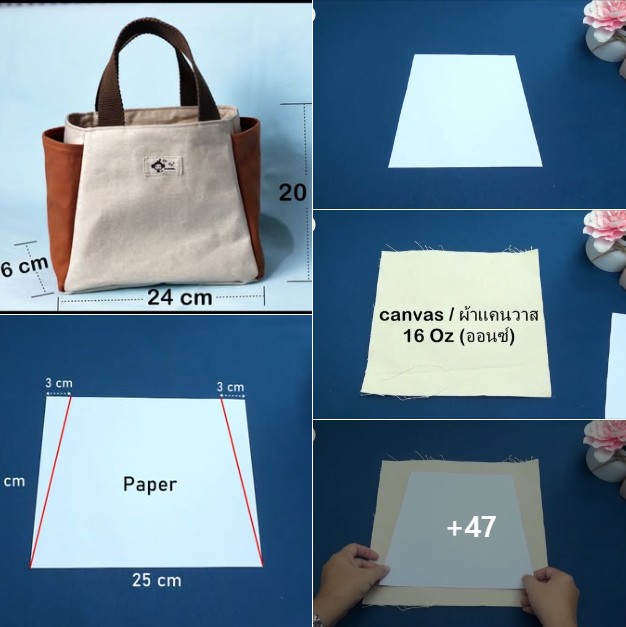
To make your mini tote bag with side pockets, you will need:
Start by choosing a sturdy fabric for the outer layer. Cotton canvas is perfect—it’s easy to sew and holds its shape well. For the lining, a lighter cotton fabric works great. Use fusible interfacing on the main body pieces to give your bag extra durability.
Cut the following pieces:
Apply interfacing to your outer body panels and pocket pieces. Iron them on carefully following the manufacturer’s instructions. This will help your bag maintain a clean, structured look.
Make sure all pieces are cut precisely. A square and accurate cut ensures all seams align, especially when sewing the side pockets and straps. Double-check your measurements before you begin stitching.
Let’s begin with the most charming detail of this tote bag—the side pockets. These not only enhance the design but are extremely useful for carrying keys, pens, or snacks.
Take the two pocket fabric pieces and fold the top edge of each down about ½ inch. Press it with an iron, then fold again to encase the raw edge. Stitch across the top folded edge to create a clean hem.
Align each pocket on one side of your outer body panels. Place them about 1.5 inches above the bottom edge of each panel. Pin or clip them in place securely.
Stitch down the left, bottom, and right sides of each pocket, leaving the top open. Make sure to backstitch at the top corners for durability. Now you have your mini tote bag with side pockets started!
For extra style and strength, you can add a dividing stitch down the center of each pocket to create two compartments per side. This is optional but a fun way to organize small items.
Press the pocket seams flat. Take time with this step—it helps make your bag look neat and professional. Ironing is just as important as stitching in any sewing project.
Repeat this process for both outer panels. Once complete, you’ll have two beautiful outer pieces, each with a functional and stylish pocket.
Now that your side pockets are ready, let’s construct the main body of your mini tote bag. This is where your bag starts to take shape!
With right sides together, sew the two outer panels together along the sides and bottom. Use a ½ inch seam allowance. If you’re using a bottom panel for a boxy shape, insert it between the two body panels and sew it into place before closing the sides.
Repeat the same process with the lining panels, but leave a 3-inch gap at the bottom for turning the bag inside out later.
If you want a flat bottom, you can box the corners. Pinch the bottom corners so the side and bottom seams meet, forming a triangle. Measure 1.5 inches from the point and draw a straight line. Stitch along that line and trim the excess fabric.
Now attach the handles. Fold each strap piece lengthwise, right sides together, and sew along the long edge. Turn them right side out, press, and topstitch for a clean finish. Attach each handle end about 2 inches from each side seam on the outer panel. Baste them in place.
With your outer bag right side out and lining wrong side out, place the outer bag inside the lining. Align the top raw edges and side seams, and pin all around the opening.
Sew around the top edge using a ½ inch seam. Then, pull the bag through the gap in the lining. Close the gap with a straight stitch, then push the lining into the bag.
Topstitch around the top edge to give your mini tote bag with side pockets a polished finish and to secure the handles firmly in place.
Now that you’ve finished your basic mini tote bag, it’s time to personalize it and make it even more special. This is where creativity shines!
Add a decorative label or patch. You can sew on a cute embroidered patch or your own handmade tag. This small detail adds a professional touch and shows it’s handmade with love.
Experiment with contrast lining. Using a bright or patterned lining can be a fun surprise when the bag is opened. It also adds character and flair to your creation.
Use magnetic snaps or buttons if you want a bag closure. This is especially useful if you plan to use the tote for everyday errands or as a purse.
Add interior pockets if desired. Use leftover fabric to sew a small patch pocket inside the lining before assembling the bag. It’s perfect for storing a phone or keys.
Adjust the dimensions to fit your needs. Want a wider bag? Add a few inches to the width. Prefer a taller bag? Increase the height. Once you understand how to make a mini tote bag with side pockets – step by step, you can adapt it freely.
Don’t forget to press all seams and edges throughout the process. Pressing is the secret to turning a homemade item into something that looks truly store-bought.
What is the best fabric for a mini tote bag?
Cotton canvas is ideal for durability and structure. Denim and twill also work well. For a softer look, quilting cotton with interfacing can be used.
Can I hand sew a mini tote bag if I don’t have a machine?
Yes, you can hand sew it using a backstitch for strong seams, though it will take more time. Use a sturdy thread and make small, tight stitches.
How do I adjust the pattern for a larger tote bag?
Simply increase the width and height of all your pieces equally. Don’t forget to lengthen the straps too for balance.
What kind of interfacing should I use?
Use medium-weight fusible interfacing for the outer panels. This gives your bag structure without making it stiff.
Can I wash my tote bag in the machine?
Yes, as long as all fabrics used are washable. Turn it inside out and use a gentle cycle with mild detergent. Air drying is recommended.
How long does it take to make a mini tote bag?
For beginners, this project typically takes 2 to 3 hours. With practice, it can be completed in under an hour.
Congratulations! You now know how to make a mini tote bag with side pockets – step by step. With just a few materials and some time at the sewing machine, you’ve created a beautiful and functional bag perfect for everyday use or gifting.
From measuring and cutting to adding stylish pockets and neat topstitching, each step taught you a new skill. Best of all, you now have a personalized item that reflects your creativity and care.
We’d love to hear what you thought of this tutorial. Leave your honest opinion in the comments, and feel free to suggest other project ideas you’d like to see in future step-by-step guides!


