
Pie Carrier Sewing Pattern

Shoulder Bag With One Inner Zippered Pocket – Free Pattern is a practical and stylish project that crafters of all skill levels can enjoy. Whether you’re a beginner exploring the world of handmade accessories or an experienced sewist looking for a fresh project, this shoulder bag offers the perfect blend of beauty and function.
With its roomy interior and secure zippered pocket, it’s both a fashionable statement and a reliable everyday companion.
Creating your own Shoulder Bag With One Inner Zippered Pocket means you get to choose the fabric, size, and finishing touches. This customization makes the bag truly yours while saving money and allowing you to upcycle materials, such as old clothes or leftover fabric scraps.
The inclusion of a free pattern also makes this project accessible, empowering more people to try their hand at bag-making without the cost of store-bought templates.
This type of shoulder bag is ideal for carrying your daily essentials—wallet, phone, keys, a small notebook, and more—while the inner zippered pocket provides added security for items like cash or important cards.
In this article, we’ll guide you step-by-step on how to create this beautiful and functional item, sharing helpful tips, material ideas, and expert insights so that you feel confident from start to finish.
A Shoulder Bag With One Inner Zippered Pocket – Free Pattern is perfect for modern life, offering both functionality and style. Unlike ordinary tote bags, this design includes a secure inner compartment that keeps your valuables safe and easy to reach. For everyday use, this is a major benefit, especially in busy public spaces.
Many people prefer shoulder bags because they are comfortable and versatile. Whether you’re going shopping, heading to work, or just walking around the city, this bag rests securely on your shoulder and frees up your hands. This allows you to multitask without worrying about keeping an eye on your belongings.
The free pattern offers a great entry point for beginners. It simplifies the design process while still leaving room for creativity. You can modify the shape, size, or color to match your personal style. Even advanced sewists find it satisfying to return to basic, well-thought-out projects like this one.
Including an inner zippered pocket also teaches a valuable sewing skill. Installing a zipper might seem intimidating at first, but this project introduces it in a simple, manageable way. Once you learn this skill, you can apply it to other bags, clothing, and accessories.
Moreover, this bag makes a wonderful handmade gift. Friends and family will appreciate the thought and effort behind something so practical and beautiful. Because it’s customizable, you can personalize each bag to suit the recipient’s taste.
Finally, creating your own shoulder bag with an inner pocket aligns with sustainability. By choosing to sew your own accessories, you’re actively reducing reliance on mass-produced items, which often involve wasteful manufacturing practices.
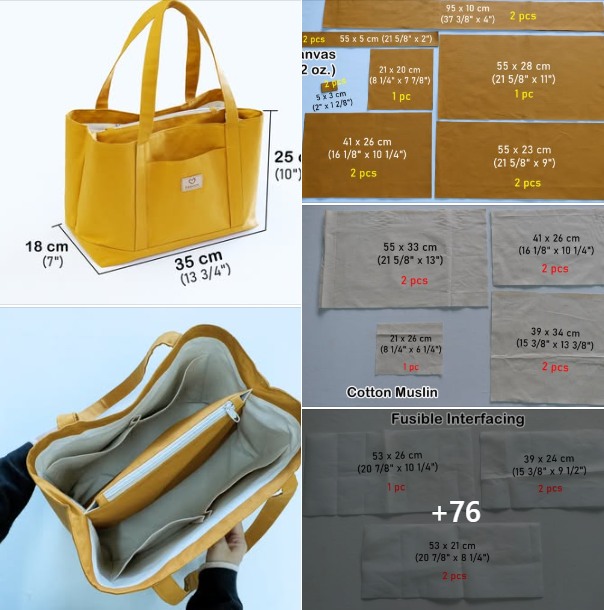
To make your Shoulder Bag With One Inner Zippered Pocket – Free Pattern, gather the essential materials. Choosing quality fabric and reliable hardware can make a significant difference in your finished result. Always prewash your fabric to avoid shrinkage after the project is complete.
You’ll need two types of fabric: one for the outer bag and one for the lining. Cotton, canvas, or denim are sturdy choices for the outside, while a lighter cotton or satin works well for the inside. Make sure both fabrics coordinate well in color and texture for a professional look.
The zipper is a crucial component for the inner pocket. Opt for a standard nylon zipper, around 6 to 8 inches long. Invisible zippers can be used if you want a sleek look, but standard ones are easier to install for beginners.
You’ll also need basic sewing tools like fabric scissors, pins or clips, a seam ripper, and tailor’s chalk. A sewing machine is ideal for stronger seams, but hand-sewing is also possible with patience. A zipper foot attachment is helpful for sewing close to the zipper teeth.
Interfacing adds structure to the bag, especially if you’re using soft fabric. Fusible interfacing is easy to apply and gives a nice finish. For handles, you can use matching fabric strips or opt for ready-made straps from your local craft store.
Lastly, print the free pattern on standard paper and cut it carefully. Make sure you follow the size guides, especially if you’re resizing the bag. Use the pattern pieces as templates to cut out your fabric sections.
Start by cutting all your fabric pieces based on the Shoulder Bag With One Inner Zippered Pocket – Free Pattern. You should have an outer panel, a lining panel, pieces for the strap, and an extra piece for the zippered pocket. Mark all seam allowances and notches before you begin sewing.
Begin by working on the inner zippered pocket. Take the pocket lining piece and draw a rectangle where your zipper will go. Cut the opening, fold back the edges, and sew the zipper into place. Make sure the zipper functions smoothly before attaching the rest of the lining.
Once the pocket is done, sew the lining pieces together, leaving an opening at the bottom so you can turn the bag right side out later. Attach the zippered pocket section into one side of the lining, ensuring it’s straight and centered.
Now sew the outer bag pieces together. Reinforce the corners and stress points with backstitching. If your design includes a boxed bottom, now is the time to form it by pinching and sewing the corners to create depth in the bag.
Sew the straps next. If you’re making fabric straps, fold each strip lengthwise, right sides together, and sew down one long edge. Turn them right side out, press flat, and topstitch for a polished finish. Alternatively, attach pre-made straps after sewing the main panels.
With both the outer and lining parts ready, it’s time to assemble the bag. Place the outer bag inside the lining, right sides together, aligning seams and strap ends. Sew around the top edge, then pull the entire bag through the opening in the lining. Stitch the lining closed and topstitch the upper edge for a neat, strong finish.
Your Shoulder Bag With One Inner Zippered Pocket – Free Pattern can be a blank canvas for endless creative ideas. Whether you want something minimal or vibrant, customization adds charm and uniqueness to your bag.
Add appliqué or embroidery on the outer panel. This is a great way to personalize your bag or include motifs that reflect your interests. Even simple shapes like hearts, initials, or flowers can make a big difference.
Consider using contrasting fabric for the inner zippered pocket. A bold color or pattern can surprise and delight anyone who opens the bag. It also helps you quickly locate your valuables inside.
Pockets can be added to the exterior too. A slip pocket or a flap pocket offers extra storage and a layered look. Use the same basic skills you learned for the zippered pocket to expand your design.
Decorative hardware like rivets, magnetic snaps, or D-rings can elevate the bag’s style. These items are inexpensive and add a professional touch. Be sure to reinforce the areas where they’re applied.
If you want a convertible design, sew D-rings to the sides of the bag and create an adjustable strap. This way, your shoulder bag can also be worn crossbody. It’s great for travelers or busy days.
Finally, don’t forget labels! If you’re selling or gifting your bags, a small handmade tag inside adds a final, lovely detail. You can even print your own fabric tags at home.
Q: Is this project suitable for beginners?
A: Yes, absolutely! While the zipper may seem tricky, the instructions simplify it. It’s a great first bag project.
Q: What size zipper should I use?
A: A 6–8 inch zipper works well for most inner pockets. Choose one that fits the width of the pocket pattern.
Q: Can I make this bag without a sewing machine?
A: Yes, but it will take more time. Use strong thread and backstitch manually for durability.
Q: What fabrics work best?
A: Sturdy cotton, canvas, denim, or even upholstery fabric are ideal for the outer layer. Use lighter cotton for the lining.
Q: How can I resize the bag?
A: Use a copier to scale the free pattern up or down. Just make sure you adjust strap lengths and pocket placement accordingly.
Q: Can I sell the bags I make from this pattern?
A: Yes, typically you can, especially with free-use patterns. However, it’s always good to credit the source and double-check usage rights.
In this article, we explored how to create a Shoulder Bag With One Inner Zippered Pocket – Free Pattern, from gathering materials to sewing and customizing your final creation. We covered why this bag is such a practical choice, offered detailed sewing instructions, and shared creative ways to personalize your bag to make it truly yours.
Whether you’re sewing for yourself, for gifts, or even to sell, this project provides an excellent foundation. You’ve learned how to install a zipper, add structure with interfacing, and finish with topstitching and strap attachment. It’s a fulfilling experience from start to finish.
If you enjoyed this tutorial or have any questions, please leave a sincere comment below with your thoughts or suggestions. Your feedback helps us grow and provide even better content for the crafting community.


