
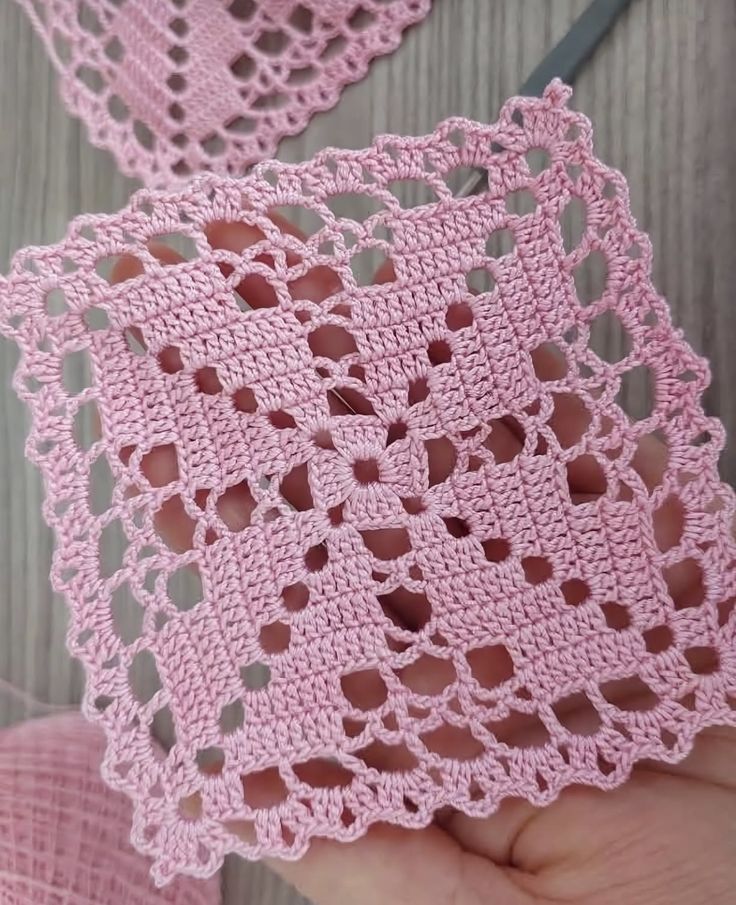
If you’ve ever admired delicate lace doilies or vintage-inspired table runners, learning how to crochet beautiful pinwheel lace motifs is a must.
These graceful spiral-like designs bring elegance and texture to your crochet projects and are perfect for adding a sophisticated handmade touch to garments, home décor, and accessories.
In this article, we’ll guide you through how to crochet beautiful pinwheel lace motifs from start to finish. Whether you want to make just one motif for a coaster or combine several for a large lace piece, this tutorial provides everything you need. The process is meditative, enjoyable, and delivers stunning results.
Even if you’re still a beginner in crochet, don’t worry—crocheting pinwheel lace motifs is more approachable than it looks.
With some patience, the right stitches, and a bit of practice, you’ll soon be making your own spinning lace wonders. Let’s begin your lace crochet journey!
1. Materials and Tools You Will Need
Before diving into how to crochet beautiful pinwheel lace motifs, it’s important to gather the right materials. The proper tools make a big difference in the ease and outcome of your work.
Start with a fine cotton crochet thread. Size 10 crochet thread is a great standard for lace, offering definition and a classic lacey appearance. You’ll also need a steel crochet hook—typically between 1.5mm and 1.75mm for this thread size.
Have sharp embroidery scissors handy for clean cuts. You’ll also want a tapestry needle for weaving in ends and a blocking board and pins to shape your motif once completed. Blocking enhances the design by stretching it into its final, open form.
Choose a soft, neutral thread color like ivory, blush, or pale gray to emphasize the lacework. However, you can explore bolder tones like emerald or royal blue for dramatic flair.
You can optionally use starch spray to stiffen the motif if you plan to hang or frame it. This is a common finishing touch when making lace motifs into ornaments or home decor.
With these materials ready, we can now move on to the actual process of how to crochet beautiful pinwheel lace motifs.
2. Starting the Pinwheel Motif
The construction of the pinwheel lace motif usually begins in the center and spirals outward in a circular or flower-like pattern.
To begin, create a magic ring (also called a magic loop). This adjustable center is ideal for lace since it avoids a visible hole in the middle. Chain 4 to count as the first treble crochet (tr), then work a set of treble crochets into the ring, usually grouped with chains in between to form the initial spokes of the pinwheel.
For example, a typical first round might be [1 tr, ch 2] repeated 8 times into the ring. Slip stitch into the top of the starting chain to join the round. You’ve just created the foundation of the pinwheel’s core.
In Round 2, you’ll start adding lace arcs between the spokes. Chain 5 (counts as a double treble and chain), and work double trebles or long chains into the chain spaces. This begins to form the swirl that gives the motif its iconic pinwheel look.
Each round will usually involve increasing the length of stitches and the number of chain spaces, creating a delicate spiral as the motif expands.
Keep track of stitch counts, and don’t hesitate to place stitch markers if necessary. At this stage, you’ll see how crocheting beautiful pinwheel lace motifs blends rhythm and detail into one seamless flow.
3. Shaping the Lace with Swirls and Arches
As you continue, the lace swirls become more pronounced, and the real charm of pinwheel lace crochet starts to shine. This section is all about adding graceful curves and airy spaces.
In the third and fourth rounds, you’ll alternate between tall stitches (like double treble crochets) and chain loops. The chains form elegant arches, and the tall stitches give the motif its sweeping movement.
Each section may look like a small wing or petal. To achieve uniformity, make sure your tension remains consistent throughout. Loose stitches may make the motif sag, while tight stitches can make it pucker.
One of the joys of learning how to crochet beautiful pinwheel lace motifs is mastering the rhythm of increases. Many pinwheel designs use symmetrical increases in each round to expand evenly. For instance, you may increase each chain space by two or three chains each round to maintain shape.
It’s also a great time to explore variations. Some pinwheel lace motifs include picots (tiny decorative loops), while others include layered petals or pointed tips for a more dramatic edge.
Remember to count regularly. Lace can get tricky if you’re off by a stitch or two. When in doubt, rip back and fix it—your final piece will be worth the extra care.
As you approach the final round, your pinwheel motif should now be a full circular lace with beautiful spinning movement. It’s time to bring it all together with finishing techniques.
4. Finishing Touches and Blocking
You’ve now completed the crocheting part of your motif—congratulations! But finishing your pinwheel lace motif is just as important as the stitches themselves.
Fasten off your yarn carefully and use your tapestry needle to weave in the loose ends. Try to hide them within thicker stitches so they aren’t visible. This preserves the clean, airy look of the lace.
Now comes blocking. Blocking is essential for lace—it defines shape, evens out stitches, and gives that professional finish. Lightly dampen your motif and pin it out on a blocking board, gently stretching each curve and point into place.
Use rust-proof pins to secure every arch, petal, or swirl. Make sure it dries completely before unpinning. This ensures the motif will hold its shape beautifully.
If you’re using starch spray, apply it evenly and let the piece dry flat. This will help the motif maintain structure if you want to display it upright, like hanging décor.
Once dry, admire your handiwork. Your crocheted pinwheel lace motif is now ready to be used or gifted. You can attach it to table runners, sew it onto fabric as an applique, or even connect multiple motifs into a larger lace panel.
Every motif you create adds to your skill and collection. The beauty of this pattern is how versatile and timeless it is—it never goes out of style.
FAQ – How to Crochet Beautiful Pinwheel Lace Motifs
Q: Is this project suitable for beginners?
A: Yes! While it looks intricate, pinwheel lace motifs use basic stitches like chains, treble crochets, and slip stitches. Beginners can start slowly and improve with each round.
Q: What’s the best yarn for pinwheel lace motifs?
A: Crochet thread is best—especially size 10 cotton thread. It gives great stitch definition and maintains the shape well after blocking.
Q: Can I use yarn instead of thread?
A: Yes, but the look will be chunkier and less delicate. For lace-like results, stick to fine thread. However, experimenting with yarn can create bold, modern versions of the motif.
Q: How long does it take to crochet one motif?
A: A single motif takes 1 to 2 hours, depending on the size and complexity. Once you get used to the pattern, it becomes much faster.
Q: Do I need to block every motif?
A: Blocking is highly recommended. It defines the shape and opens up the lacework, especially for projects meant to be decorative or wearable.
Q: Can I join multiple motifs together?
A: Absolutely! You can join them during the final round or sew them afterward. This technique is perfect for making lace tablecloths, scarves, or shawls.
Conclusion
Learning how to crochet beautiful pinwheel lace motifs is a rewarding journey into the world of lace crochet. From your first chain to your final blocked masterpiece, each motif tells a story of patience, creativity, and elegance. You’ve discovered the tools, the techniques, and the joyful rhythm that comes with making your own lace.
Whether you use them in décor, gifts, or fashion, these motifs are timeless. We hope this guide inspired you to pick up your hook and give it a try. If you made it this far, we’d love to hear from you!
VIDEO TUTORIAL
Leave a sincere comment below with your thoughts, your questions, or your suggestions for future patterns. Your feedback helps shape our community, stitch by stitch.


