
Pie Carrier Sewing Pattern

If you’ve been searching for a creative, practical, and beginner-friendly sewing project, look no further than this DIY Tote Bag – Free Pattern.
Whether you’re new to sewing or a seasoned pro, making your own tote bag offers a rewarding experience and a finished product you’ll be proud to carry. Tote bags are eco-friendly, stylish, and perfect for everyday use.
With this easy-to-follow guide, you’ll learn how to create a sturdy, stylish tote from start to finish. The DIY Tote Bag – Free Pattern is designed to be customizable, budget-friendly, and suitable for different skill levels. From choosing your fabric to stitching the final seam, we’ll walk you through every step in detail.
This project requires only basic sewing tools and materials, making it accessible to anyone interested in sewing.
Whether you plan to make this as a gift, for shopping, or just for fun, you’ll love the satisfaction of creating something both beautiful and useful. Let’s dive into this exciting project using our DIY Tote Bag – Free Pattern!
Before we begin, make sure you have all the necessary tools and materials at hand. Being prepared will make your sewing journey much more enjoyable and efficient.
For this DIY Tote Bag – Free Pattern, you will need:
Choose a fabric that is durable yet easy to work with. Cotton canvas or denim are great options for the outer layer. A contrasting cotton print can add a nice touch for the lining. Don’t forget to use interfacing if you want your tote to be more structured and long-lasting.
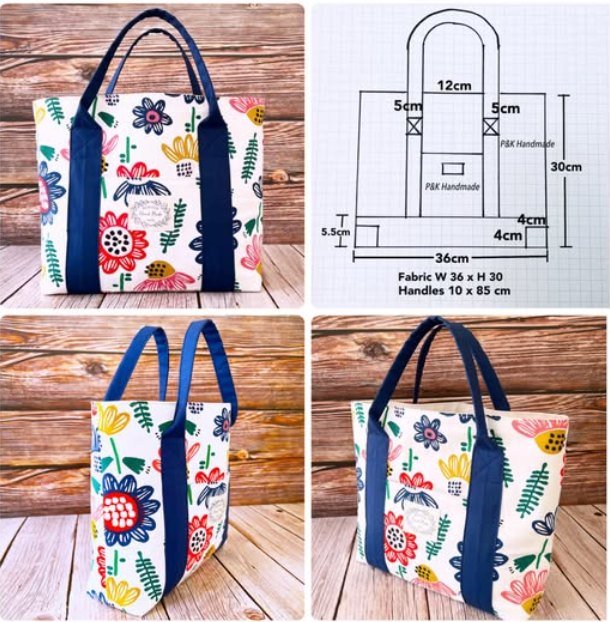
Cut the following pieces:
Iron your fabric before cutting to ensure accurate measurements and clean edges. Also, fuse the interfacing to the wrong side of the outer panels following the product instructions.
Proper fabric preparation is key to achieving a clean, professional result. Once everything is ready, you’re good to go!
Now that your fabric is prepared, let’s start with the optional pocket. It adds functionality and can give your DIY Tote Bag a unique personal touch.
Take the 8″ x 6″ pocket piece and fold the top edge down ½ inch, press, then fold it again and stitch across to hem. Fold and press the remaining three sides by ½ inch to create clean edges.
Position the pocket on one lining panel, centered horizontally and about 3 inches from the top edge. Pin in place and sew around the sides and bottom. Be sure to backstitch at the top corners for durability.
Next, let’s make the straps. Fold each strap piece in half lengthwise, right sides together, and sew along the long edge. Turn the straps right side out and press flat. Topstitch along both edges for a neat, finished look.
Straps can also be made with webbing if you prefer a quicker option. Whether handmade or store-bought, strong handles are key for a dependable DIY Tote Bag.
Once your pocket and straps are complete, we’re ready to assemble the bag body!
Place the two outer panels right sides together. Sew along the sides and bottom using a ½ inch seam allowance. Do the same with the lining panels, leaving a 3-inch gap at the bottom for turning later.
If you’d like your bag to have a flat base, you can box the corners. To do this, pinch each corner of the bag body so the side and bottom seams align, forming a triangle. Measure 2 inches from the tip and draw a line straight across. Stitch along the line and trim the excess. Repeat for all four corners (two on outer, two on lining).
Turn the outer bag right side out. Position the straps on the top edge, about 3 inches in from each side seam. Pin in place and baste them down. Make sure the straps aren’t twisted and that they line up evenly.
Now place the outer bag (right side out) into the lining (wrong side out), aligning the top edges and side seams. Pin all the way around the top opening.
Sew around the top edge with a ½ inch seam, securing the straps in the process. Then, turn the bag right side out by pulling it through the gap in the lining.
Stitch the gap closed with a small straight stitch. Push the lining into the bag and press the top edge neatly.
Finish with a topstitch around the top edge of the bag to reinforce the seam and give your DIY Tote Bag – Free Pattern a polished look.
Now that your tote is fully assembled, it’s time to have fun with customization! This is where you can let your creativity shine.
Add embellishments like embroidery, appliqué, or iron-on designs to the front of the tote. These simple touches can transform a basic bag into a statement piece.
Want extra storage? Add side pockets or interior dividers using leftover fabric. You can also create matching accessories like coin purses or mini pouches.
Consider using contrasting thread for visible seams or decorative topstitching. This adds visual interest and a stylish finish to your DIY Tote Bag.
To make the bag reusable for groceries or books, reinforce the handles with extra stitching at stress points. A small “X-box” stitch pattern where the handles attach is both functional and decorative.
If you’re making multiple bags as gifts, personalize them with initials or themed prints. Handmade gifts like these are always cherished and memorable.
Finally, take a moment to admire your finished DIY Tote Bag – Free Pattern. You’ve just turned a few pieces of fabric into something beautiful and functional—well done!
Can I make this tote bag without a sewing machine?
Yes, you can sew it by hand using a backstitch. However, it may take longer and require patience. A machine ensures stronger seams and faster assembly.
What fabric is best for a durable tote?
Canvas, denim, or duck cloth are all excellent choices. If using quilting cotton, be sure to add interfacing to give the bag more body.
How do I clean my tote bag?
Most tote bags made with cotton fabrics can be machine washed on a gentle cycle. Air drying is recommended to prevent shrinking or warping.
Can I resize the pattern?
Absolutely! To make a larger bag, increase the size of the panels and adjust strap length accordingly. The design is flexible and easy to scale.
What’s the best way to store my tote bag?
Fold it flat and store in a dry place. You can also hang it by the straps. If made with washable materials, it’s easy to refresh between uses.
Can I sell tote bags made from this pattern?
Yes, since this is a free pattern, you can sell finished products. Just remember to credit your handmade work and not claim the design as your own original pattern.
Now you’ve learned exactly how to create your own DIY Tote Bag – Free Pattern from start to finish. From selecting the perfect fabric to stitching the final seam, you’ve completed a practical, stylish, and fully customizable tote bag that you can be proud of.
This project is a fantastic introduction to bag-making and offers endless possibilities for personalization. Whether it’s for yourself, a gift, or even a small business idea, this tote bag is sure to bring both function and joy.
We’d love to hear your thoughts! Leave a sincere comment below sharing your experience or ideas for future patterns. Your feedback helps us create even better tutorials just for you!


